Most homes and offices have routers to guard their networks and distribute IP addresses to multiple computers and other devices on their local area network, or LAN. For either personal use, such as parental control, or company regulations, such as blocking shopping websites during work hours, you might want to block certain IP addresses in order to closely manage Internet access through your router. Different router models vary slightly in how the settings of IP address blocking work, but the main purpose remains the same. IP address blocking is demonstrated in this article with a TP-Link router, and you can use it as a guide for other models as well.
Step 1
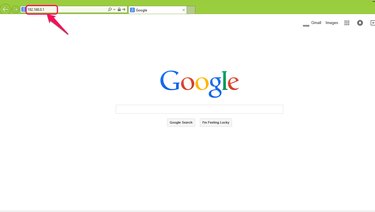
Access your router's settings page by typing the IP address or router's administration Web address into your browser. For TP-Link, for example, type "192.168.0.1" without the quotation marks, as this is the IP address for their router, then press the "Enter" key.
Video of the Day
Step 2
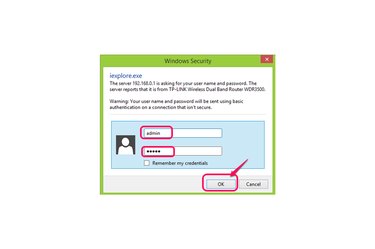
Type "admin" without the quotation marks as the user name and "admin" without the quotation marks as the password, then click "OK." These are the default settings provided by TP-Link. Different routers' instructions manuals should include their specific defaults.
Step 3
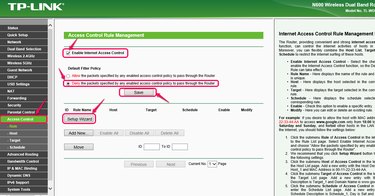
Choose the "Access Control" section on the left side bar. Check the check box for "Enable Internet Access Control" and choose "Deny" for Default Filter Policy, then click "Save." Click "Setup Wizard" to enter the settings section. The wizard will take you through each step of the process, even though "Rule" remains highlighted in green as the selected section. Alternatively, you can manually choose the Rule, Host, Target, and Schedule on the left panel and fill in each form separately outside of the wizard.
Step 4
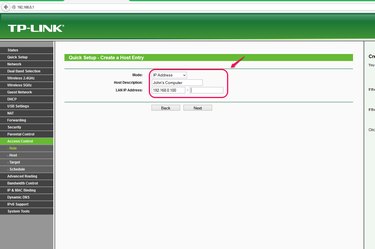
Choose "IP Address" for the Mode selection. Add the information for Host Description, which is the name of the device on your network that you want to block access for, and the IP address or range of addresses for that device. Click "Next." For example, if you had someone named John using a computer on your network and you wanted to block his computer from accessing certain websites, you could type in "John's Computer" as the Host Description and his computer's IP address in the LAN IP Address field. Click "Next" to continue.
Step 5
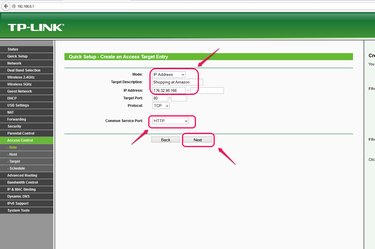
Choose "IP Address" for Mode selection. For "Target Description," describe the type of website you are going to block access to for the Host you chose, for example, "Shopping at Amazon." Next, enter the IP address of the target. For example, Amazon's home page IP address is "176.32.98.166" without the quotation marks. If you know the type of service port used to access the website, choose the type from the "Common Service Port" drop-down menu, which will populate the "Target Port" and "Protocol" fields for you. For example, choosing "HTTP" fills in "80" for the "Target Port" and "TCP" for the "Protocol." Otherwise, enter the port number or range of numbers and protocol type of the website you want to block. Alternatively, you can choose to block websites by their "Domain Name" rather than "IP Address" in the Mode drop-down menu and enter website addresses, such as "www.amazon.com," instead of IP addresses. When you are finished, click "Next."
Step 6
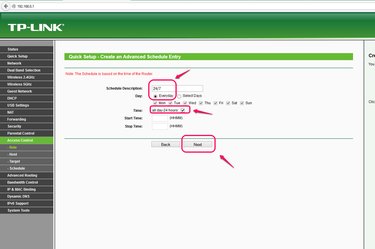
Enter a description for "Schedule Description" that describes what type of schedule restrictions you are placing on this rule. For a complete block, for example, you can enter "24/7" as the "Schedule Description," then choose "Everyday" for "Day" and "all day-24 hours" for "Time." Click "Next."
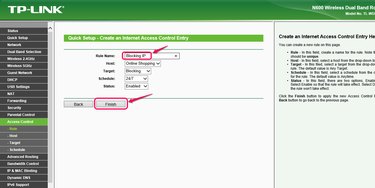
Step 7

Type a "Rule Name" you want to use for all of the settings, choose a "Host," "Target," and "Schedule," that you have set up, and click "Finish" to complete the task.
Video of the Day