Some word processing apps, like Notepad, allow you to toggle Text Wrap on and off as needed. Word 2013 does not allow you to turn off word wrap. Microsoft Word does, however, include options that enable you to customize how the text appears in a document, as well as how it is wrapped around images.
If you understand how word wrap works in relation to page width, as well as line breaks, hyphenation and text wrap around images, you should always be able to get the format results you need.
Video of the Day
Video of the Day
Understanding Word Wrap
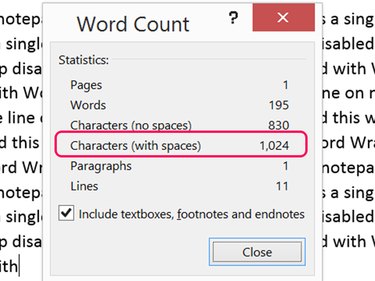
When you toggle off the Word Wrap option in Notepad — available from Notepad's Format menu — you'll find that Notepad eventually goes to a second line if you continue typing long enough -- after reaching about 1,024 characters.
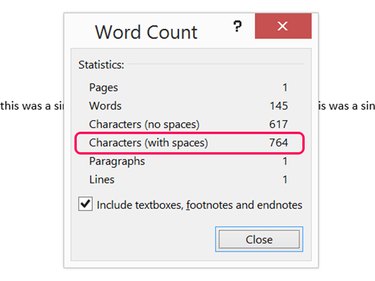
In Microsoft Word 2013, word wrap only becomes an issue when you reach the end of a line. Word lets you get close to Notepad's character count per line, provided you reduce the margins to zero and increase the page width from the default size of 11 inches to its maximum of 22 inches. With the minimum 5-point font, like Calibri Light or Arial Narrow, Word will then let you enter about 764 characters before word wrap kicks in. The number of characters can vary, depending on which font you use and how many spaces are within the line.
Editing Line Breaks
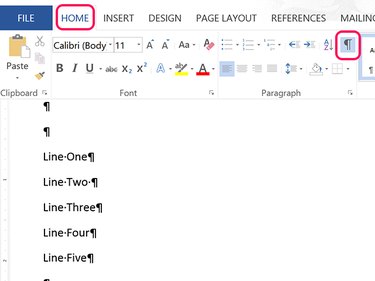
If you've pasted text into a Word document and it presents you with unexpected line breaks, you can view and edit these by clicking the Show Paragraph Marks icon under the Home tab. Highlight each line break that you don't want and press the Delete key.
Disabling Hyphenation
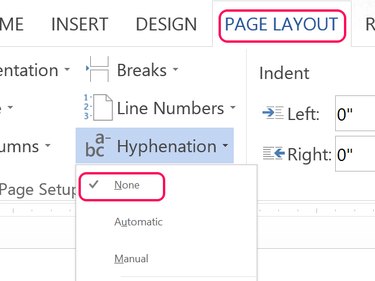
To eliminate automatic hyphenation at the end of a line, click the Page Layout tab and then click the Hyphenation icon. From the drop-down menu, select None to have no hyphenations at the end of a line or select Automatic to add them yourself when desired.
Text Wrap and Images
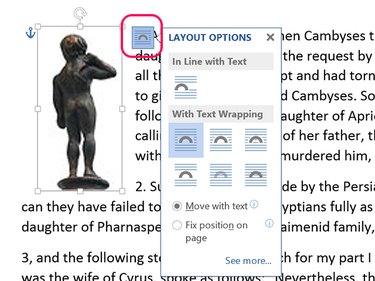
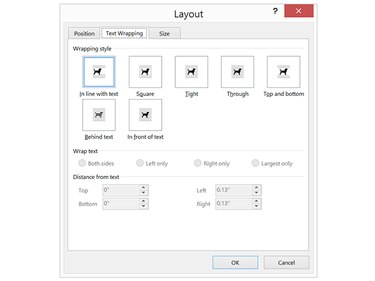
In Microsoft Word 2013, you have several options to adjust the way text flows around images. Click the image, and then click the Layout Options icon that appears in the upper-right corner. From the drop-down menu select the layout option that best suits your work:
- In-line With Text
- Square
- Tight
- Through
- Top and Bottom
- Behind Text
- In Front of Text
Select the Move With Text option, if desired. To pin the image to a specific place on the page, click the Fix Position on Page option.
For advanced options, select See More from the bottom of the Layout Options drop-down menu. Click the Text Wrapping tab to specify if the text should wrap on both sides or not, as well as how much space should be placed between the text and the image.