Using Excel 2013, create a receipt that you can easily customize for every sale. Using formulas in a receipt lets you enter prices for the items you sold without having to take out the calculator. You can then print the receipt or offer to email it to your client.
Creating a receipt basically dresses up a basic Excel worksheet so it's recognized as a receipt from your business, including subtotals, tax and the total price.
Video of the Day
Video of the Day
Creating Your Own Receipt
Page Layout and Formatting
Step 1
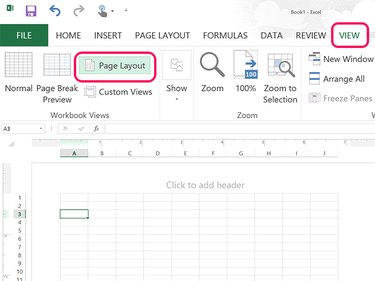
Open a blank workbook in Excel. Click the View tab and then click the Page Layout view in the ribbon so that you can easily see where the page borders are for a letter-sized paper. To use a different size paper for printing, change that now using the Size options under the Page Layout ribbon.
Step 2
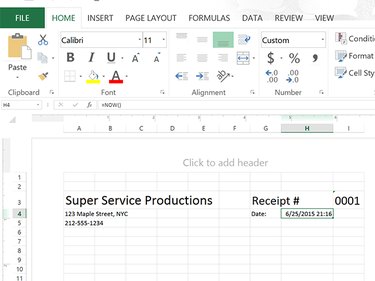
Enter your business name, address and phone number on the right. On the left, type Receipt and a receipt number, such as 0001. To ensure that the zeros are displayed, click the Home tab and change the Number menu to Text for the receipt number cell. To change the text size and font, highlight the cells and use the Home menu options. To include a live date and time that changes automatically for each receipt, type =NOW() in the date cell.
Step 3
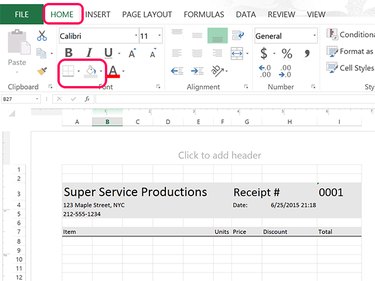
Type column headers beneath the business information, including Item, Units, Price, Discount and Total. Highlight the column header cells by dragging the cursor over them and add a double line below them by clicking the Home tab and selecting Double Bottom Border from the Border icon. Click the Fill icon and select a light color, like a light gray. Highlight the business information section and use the same Fill color for those cells as well.
Step 4
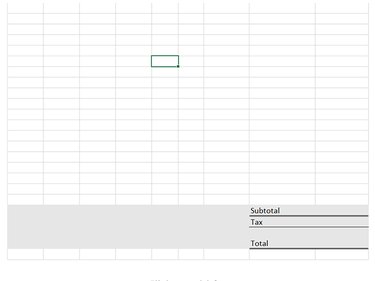
Scroll to the bottom of the page. In the second column from the left, type Subtotal, Tax and Total in the column. Highlight these rows and use the same Fill color that you used at the top of the page. Use a Double Bottom Border beneath the Subtotal and Total cells. Use a Thin Single Border on the Tax cells.
Step 5
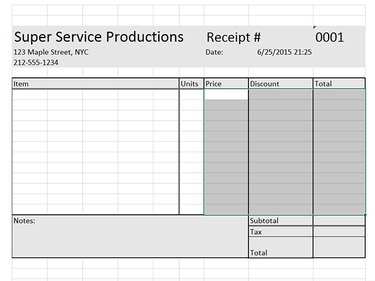
Separate each section of the receipt with a Box Border from the Border icon in the Home ribbon. For the group of cells to the left of the Total and Subtotal section, add any additional information you want to include in the receipt, or use it for notes, as displayed in the screenshot.
Highlight all of the empty cells in the Price, Discount and Total column. Click the Home tab and change the Number menu from General to Currency.
Formulas
Step 1
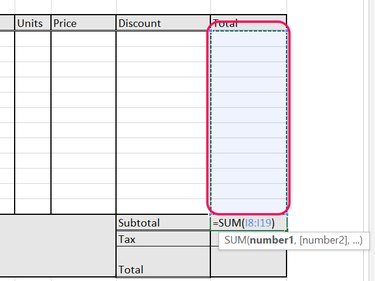
Select the Subtotal cell. Click the Formulas tab and then click the AutoSum icon. Drag the cursor across all of the Total cells and press Enter. Whenever you add a value in these cells, they are added to the Subtotal.
Step 2
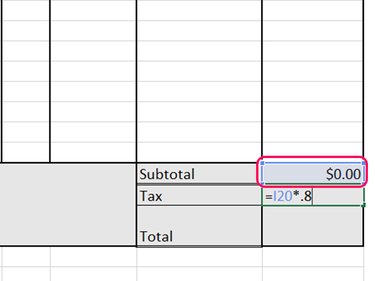
Select the Tax cell, which will multiply the Subtotal by your local tax rate. Type an = and click the Subtotal cell. Enter an *** and then the tax percentage as a decimal. In the example above, we're using an 8-percent tax rate on the Subtotal cell **I20, so the formula is =120*.8. Press Enter.
Step 3

Click the Total cell and then click the AutoSum icon in the Home ribbon again. Highlight the Subtotal and Tax cells and press Enter. The total adds the tax to the subtotal.
Step 4
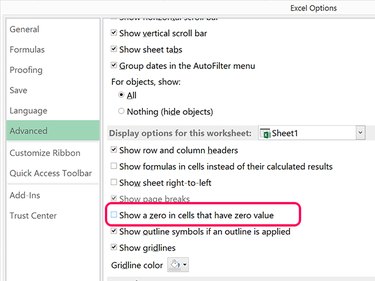
Make the Excel worksheet leave any cells with a zero value blank, otherwise there will soon be a lot of $0.00 entries in the receipt. To do this, click the File tab, select Options and then Advanced. Scroll down and then clear the check box beside Show a Zero in Cells That Have Zero Value. Click OK.
Step 5
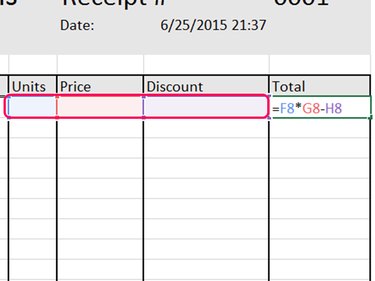
Select the first empty Total cell. This cell needs to multiply the units by the price, and then subtract any discount entered. Type = and click the Units cell, type *** to multiply, click the **Price cell, type - to subtract and then click the Discount cell. In our example, if the screenshot isn't clear, the formula is =F8*G8-H8. Press Enter.
Copy this formula by selecting this cell and pressing Ctrl-C. Paste it into all of the empty item total cells below it by highlighting them and pressing Ctrl-V.
Step 6

Test the receipt by entering data into the cells, using $10 items so you can easily see if the item totals, subtotal, tax and the final total are correct. Assuming they are correct, save the receipt file.
Using a Receipt Template
Step 1
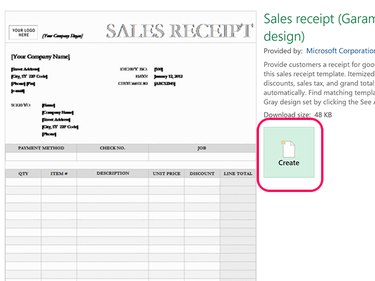
Open Excel, or click the File tab if it's already open. Type Receipt in the Search field. Click a receipt to see a preview and click the Create button to open it.
Step 2
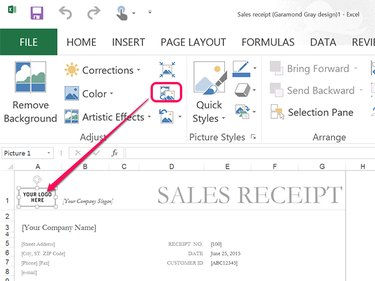
Replace all of the business information fields with your own details. If the receipt has a place for your business logo, select the Placeholder image. Click the Picture Tools' Format tab and then click the Replace Image icon. Select your image in the navigation menu and it is automatically sized to fit the template.
Step 3
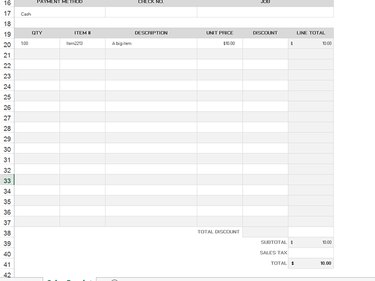
Test the template to ensure it works as it should. Enter a $10 item and then examine the Subtotal and Total cells. Make any other changes you wish and then save the file in XLSX format by clicking the Save icon at the top of the window.