Using an Excel template provides an intuitive way to create invoices for low and moderate-demand business use. Complementing a template with Excel macro functions to automatically add unique invoice numbers provides convenience and avoids the confusion of duplicate invoice numbers.
Step 1: Open an Invoice Template
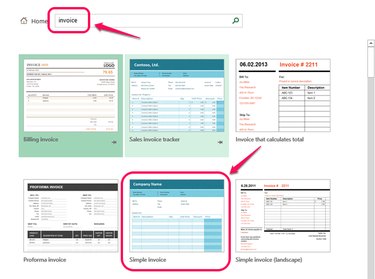
Open Excel, enter invoice into the search box at the top of the window and press Enter. Locate Simple Invoice provided by Microsoft to use as an example. Click on the icon, and then click Create.
Video of the Day
Step 2: Save the Template
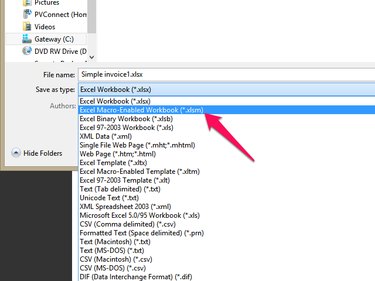
Enter 1000 in cell L8 next to the text "Invoice #." This will be the base invoice number. The rest of the invoice can be edited to suit your needs. When complete, save the changes to a macro-enabled file, using the XLSM format.
Step 3: Create the Invoice Number Macro

Select the View tab, and then click Macros on the ribbon. Click Record Macro from the drop-down and enter the macro name, shortcut and description as shown above. Click OK. In this example, the macro steps will be entered manually. Click Macros on the ribbon again, and then Stop Recording.
Step 4: Edit the Invoice Number Macro
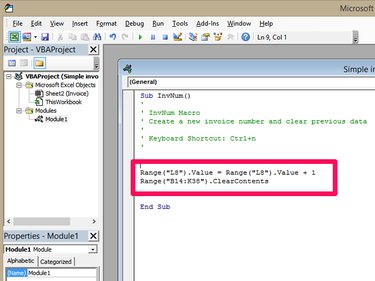
Click Macros on the ribbon again, and select View Macros. Highlight the InvNum macro you just created and click Edit. Enter the following text below the green comments, as shown above.
- Range("L8").Value = Range("L8").Value + 1
- Range("B14:K38").ClearContents
L8 is the invoice number field and the range B14 to K38 is the invoice data area. Press Ctrl-S to save the macro in the Visual Basic editor, and then return to the Excel spreadsheet and press Ctrl-S to save the worksheet. Press Ctrl-N to increment the invoice number.
Step 5: Using the Invoice Template
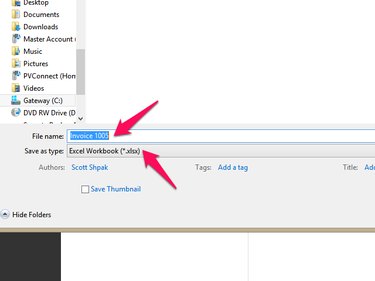
When you open the macro-enabled invoice worksheet Simple invoice1.xlsm in this example, press Ctrl-n to advance the invoice number by one. Fill in the invoice as you would normally, and then click the File tab on the ribbon and select Save As. Enter a file name and select Excel Workbook (*.xlsx) in the Save as Type field. Click Save and your invoice is saved without the macro, while your original copy is ready to generate another invoice.
Video of the Day