How to Save Money on Your Energy Bill: 4 Easy Home Fixes
The typical American household spends around $2,000 a year on home energy, according to Consumer Reports, and a meaningful chunk of that escapes through habits and inefficiencies that cost almost nothing to fix. This guide walks through four steps thermostat adjustment, LED bulb swaps, draft sealing, and water heater temperature reduction ranked from fastest payback to most durable savings. Do all four, and you could cut your energy bill by over $1,000 a year if your home still runs on incandescents, an older tank water heater, and a drafty building envelope.
That figure reflects best-case conditions. Actual savings depend on your fuel type, climate, utility rates, and how inefficient your home already is. Think of it as a ceiling, not a guarantee.
Before you start: This guide assumes you control your thermostat, light fixtures, and can make minor repairs around doors and outlets. Three of the four steps require no tools and no landlord approval. Draft sealing may need a quick lease check. None require a contractor.
Start here based on your situation:
- Renter in an older building: prioritize draft sealing and LED swaps
- Homeowner with a tank water heater: adjust the thermostat tonight, check the water heater this weekend
- Already converted to LEDs: skip Step 2 and spend that time sealing instead
Step 1: Adjust your thermostat tonight free, no tools required
Video of the Day
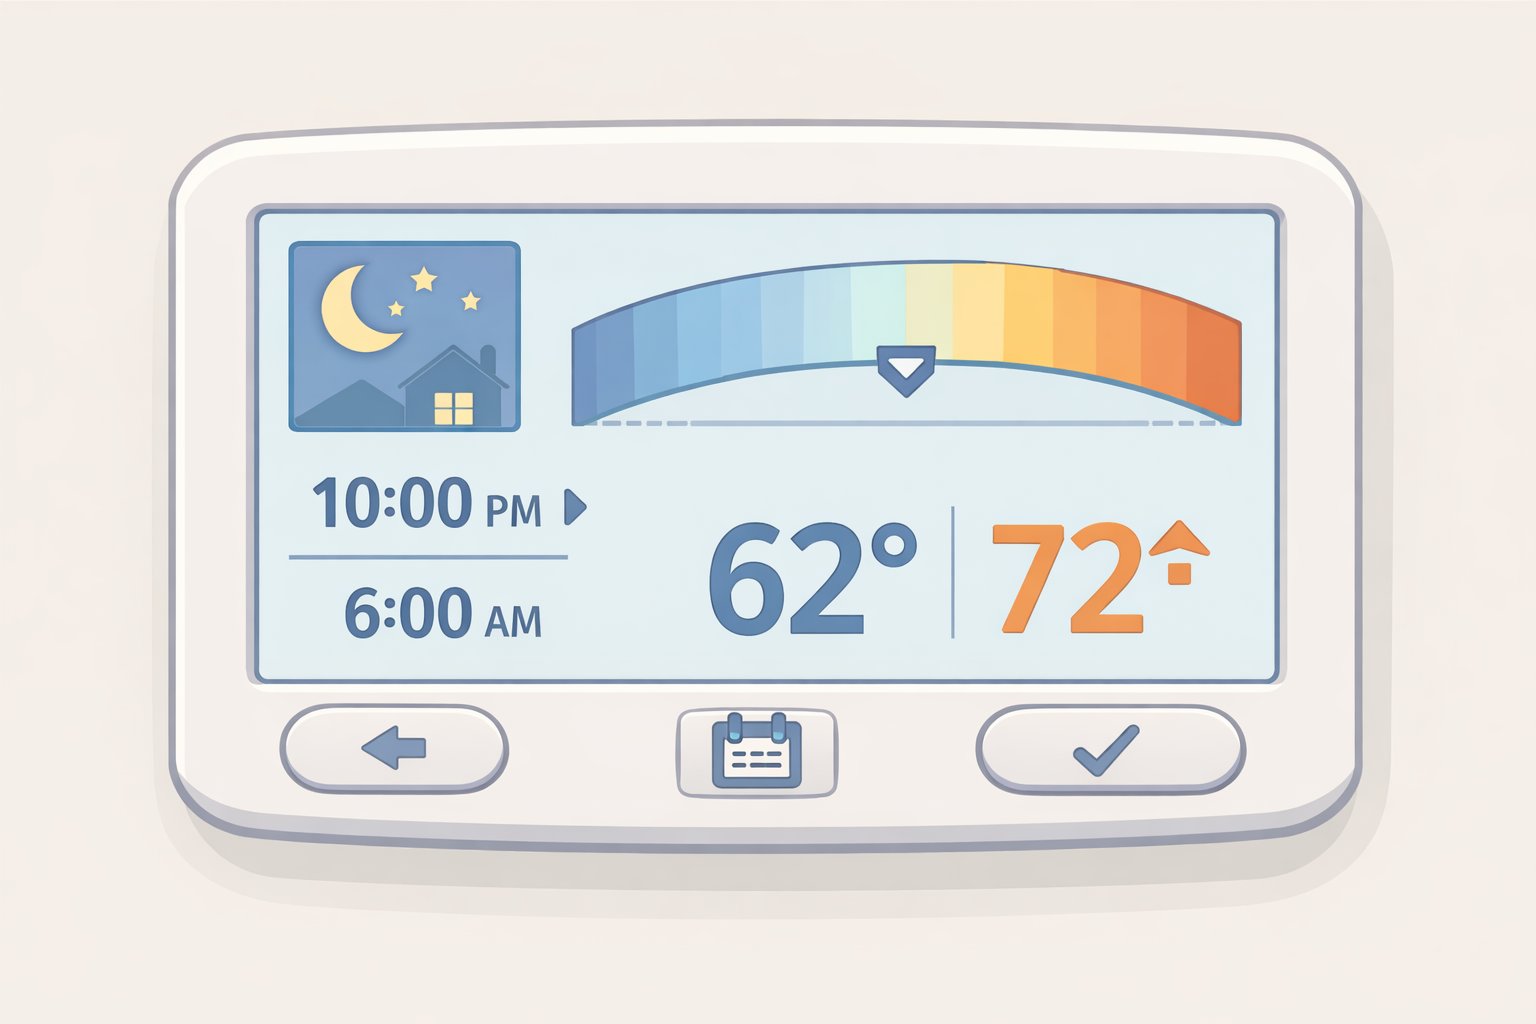
Heating and cooling together account for nearly half the average household's annual energy spending, according to ENERGY STAR. That makes the thermostat the single highest-use dial in the house. Lowering it 7°–10°F for eight hours a day, overnight or while the home sits empty, can cut annual heating costs by up to 10%, which works out to roughly $82 a year based on EIA estimates, per Consumer Reports.
If a smart thermostat is on your radar: an ENERGY STAR-certified model saves an average of $50 a year on heating and cooling costs, closer to $100 for homes that are empty much of the day, per ENERGY STAR. Entry-level models start around $60, according to Consumer Reports, so the hardware typically pays for itself within the first year.
Steps:
- Tonight, set your thermostat 7°–10°F lower than your usual nighttime temperature before bed.
- If the home is empty during the day, program a second setback for those hours. Most programmable thermostats handle this with a few button presses.
- Before buying a smart thermostat, check your utility's website for rebates. Many offer $50–$100 back, which can cover most or all of the hardware cost. ConEd in New York, for example, offers an $85 rebate for eligible installs, per Consumer Reports.
- To install, turn off power to the HVAC at the breaker, photograph your existing wiring, and follow the terminal guide in the new unit's manual. Most installs take 20–30 minutes.
- Set a schedule: cooler overnight, warmer before you wake, cooled again when the house empties. Don't push the setback past 10°F recovering from a larger swing forces the system to work harder and erodes the savings.
Watch out: Smart thermostats are not compatible with high-voltage baseboard electric heat (240V systems). Check the manufacturer's compatibility tool before purchasing. The $82 and $50 savings figures above apply to heating and heating/cooling costs respectively, not the total energy bill.
Video of the Day
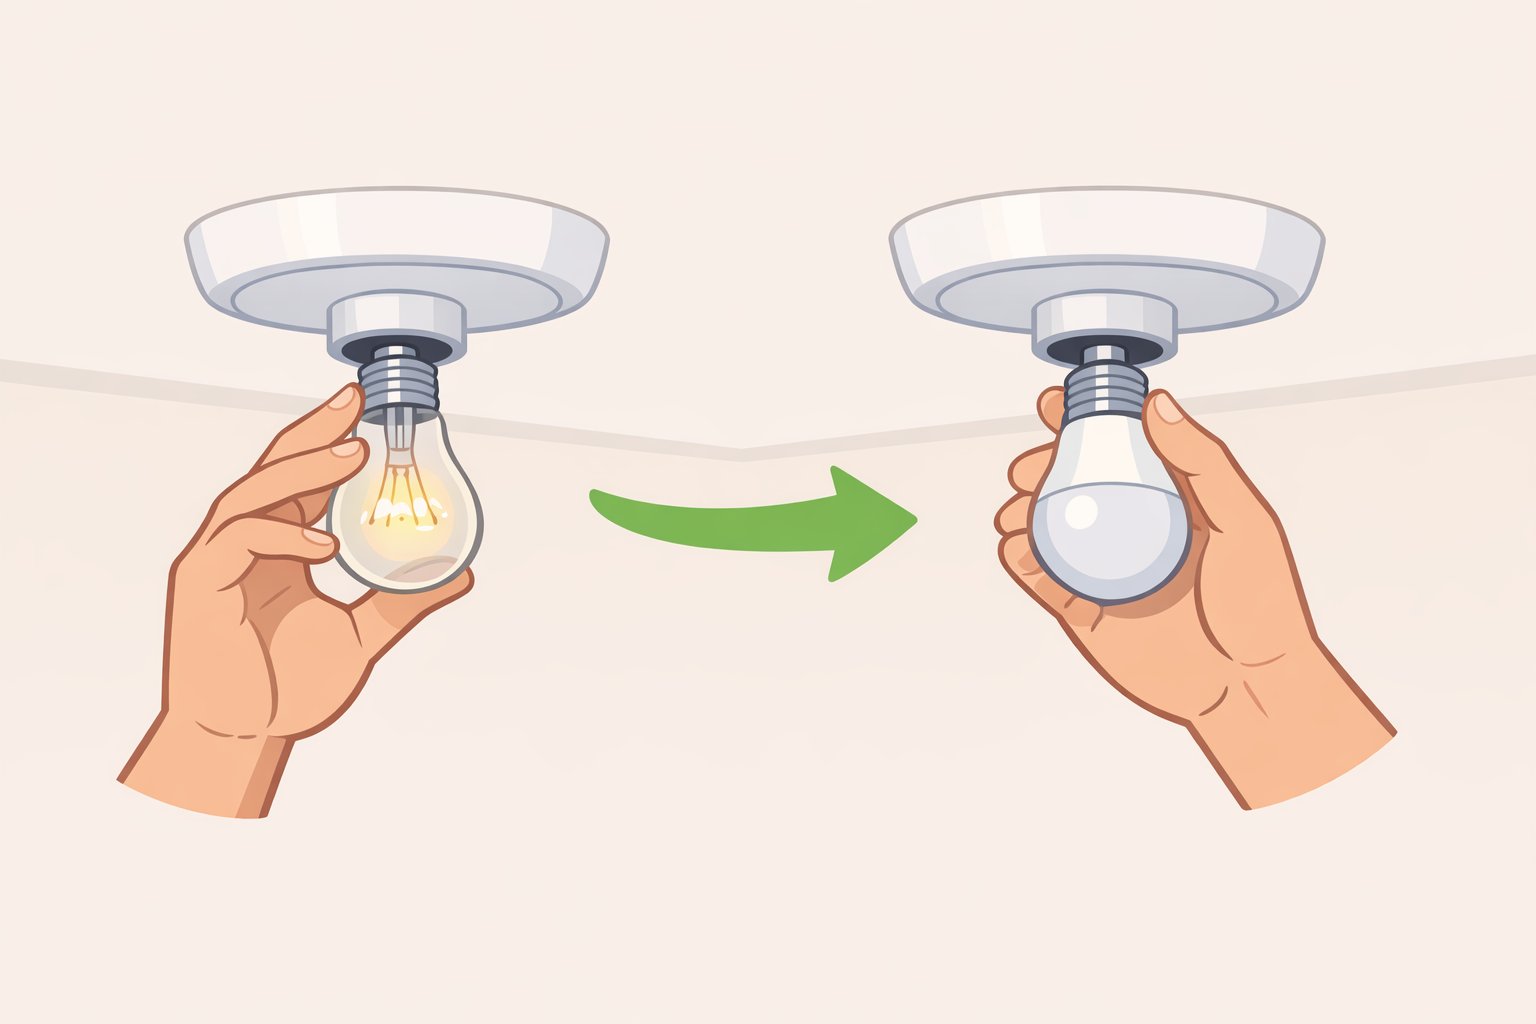
Step 2: Replace your most-used bulbs with LEDs under $20, savings show up next month
Of the four steps, this one has the most predictable return. The bill drops the month you make the swap.
Replacing every incandescent with a comparable LED can save an average of $225 a year on energy costs, per the Department of Energy, cited by Consumer Reports. ENERGY STAR-certified LEDs use up to 90% less electricity than standard incandescents and last roughly 15 times longer, reducing both running costs and replacement costs over time, according to ENERGY STAR.
A full swap isn't always practical right away. Replacing just the five fixtures used most saves approximately $40 a year on its own, per ENERGY STAR. For renters or anyone working with a tight budget, that's a reasonable starting point.
Who benefits most: Households still running incandescent bulbs in fixtures that stay on for several hours a day kitchens, living rooms, exterior lights. If you've already converted, this step is done.
Steps:
- Walk through the home and identify incandescent bulbs. Look for a visible filament, or packaging labeled "incandescent." Note the wattage stamped on the base or glass.
- Match each to an LED equivalent. A 60W incandescent typically maps to an 8–10W LED; the packaging confirms comparable lumen output.
- Prioritize fixtures that run the longest each day: kitchen overheads, desk lamps, exterior security lights. These give the fastest payback.
- Buy ENERGY STAR-certified bulbs. The certification means verified efficiency. A generic "LED" label carries no equivalent guarantee.
- Install and check your next bill. The reduction shows up immediately.
Watch out: Older dimmer switches may not be compatible with LED bulbs, causing flickering or humming. Check the dimmer manufacturer's compatibility list before assuming it's fine. An LED-compatible dimmer typically costs under $20 to replace.
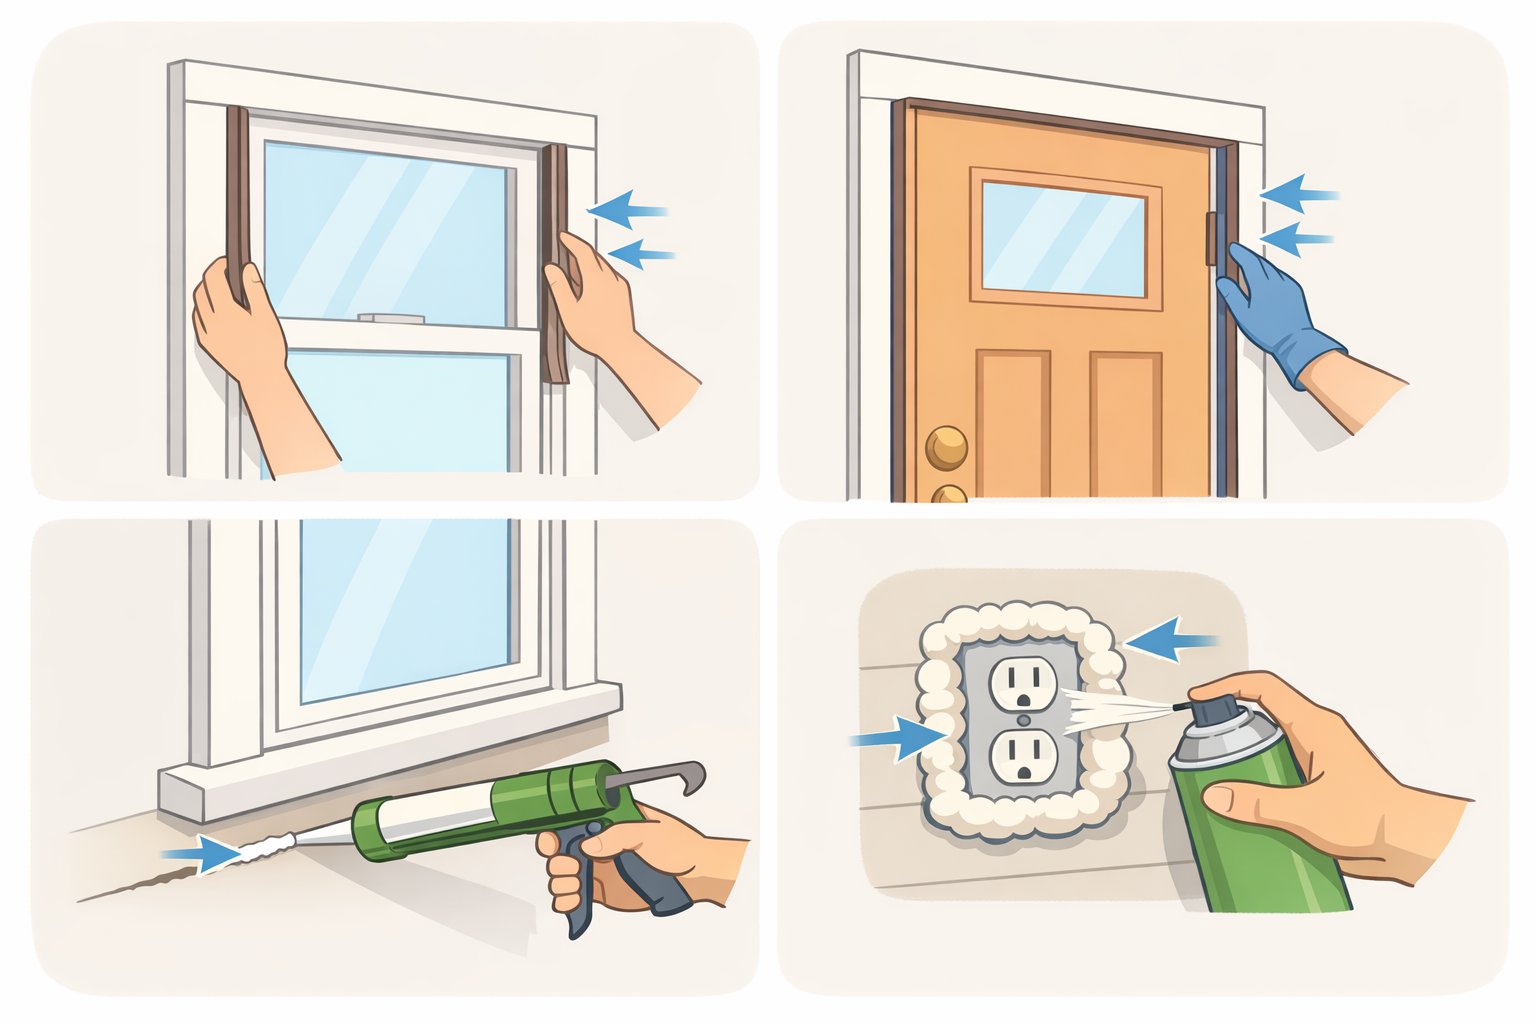
Step 3: Seal drafts and air leaks about $30, close to $200 a year in savings
This is the most underestimated step on the list. The materials are cheap; the return is among the largest of any no-contractor fix available.
Between 25% and 40% of a home's heating and cooling energy escapes through gaps and cracks that are easy to overlook, per Consumer Reports, citing DOE data. Sealing those gaps with caulk, weatherstripping, and foam roughly $30 in materials can cut energy use by at least 10%, worth approximately $188 a year based on EIA figures, per Consumer Reports. In a heavily leaky home, the upper estimate climbs to $27 a month, or $324 a year, according to Consumer Reports.
For a sense of what's possible beyond this first step: modest weatherization combining air sealing with improved attic insulation reduces home energy use by 12%–18% on average, with most electrified households saving $500–$800 a year after the work is done, according to an ACEEE report from mid-2023. That's a bigger project, but it starts with the same $30 move described here.
Who benefits most: Owners or renters of older homes, detached houses, or units with exterior-facing windows and doors that get cold in winter or hot in summer. Tightly built newer apartments may have less to gain.
Steps:
- On a cold or windy day, run your hand slowly along the edges of exterior doors, windows, electrical outlets on exterior walls, and anywhere pipes or cables enter the home. A lit incense stick is more precise watch the smoke for movement.
- For movable gaps around operable windows and door frames, apply self-adhesive foam weatherstripping. It comes in rolls, cuts with scissors, and costs under $10 per door or window.
- For fixed gaps where trim meets wall, around pipe penetrations, along the foundation sill use paintable caulk for narrow gaps or minimal-expanding foam spray for larger ones. Apply a thin bead, smooth with a damp finger, let it cure.
- Check the attic access hatch and any recessed ceiling lights on the top floor. Both can be significant sources of heat loss into unheated attic space and are straightforward to address with foam backer rod and caulk.
- Repeat the incense test after sealing to confirm the drafts are gone.
Watch out: Use minimal-expanding foam near door frames and structural elements standard expanding foam can distort the frame. For renters: foam weatherstripping peels off cleanly, and caulk can be painted over. Sealing drafts at doors and outlets is generally renter-safe, but check your lease before making permanent changes to windows or walls.
Step 4: Turn down your water heater to 120°F five minutes, up to $414 a year
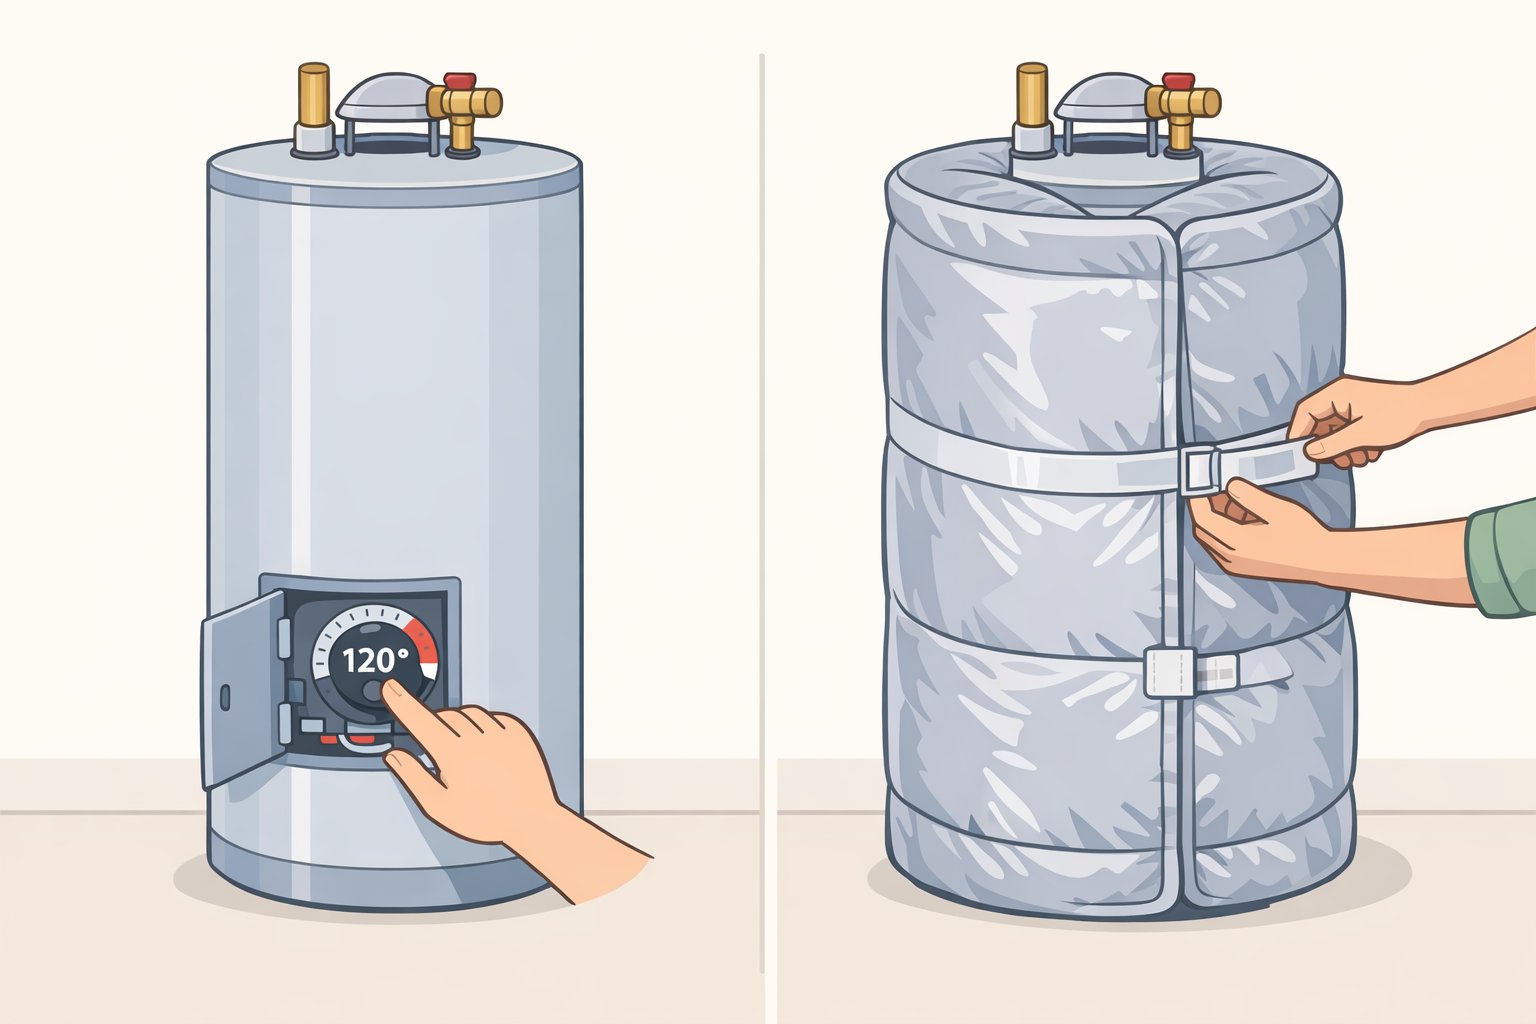
Resetting a tank water heater from 140°F to 120°F can cut water heating energy costs by 4%–22% annually, according to the DOE. Consumer Reports translates that range to $75–$414 in savings depending on usage, fuel type, and current utility rates.
The effect compounds. Hot water heating accounts for about 90% of the energy a washing machine uses per cycle, per ENERGY STAR, so reducing the heater's operating temperature ripples across daily water use throughout the house.
If the outside of the tank feels warm to the touch a sign of standby heat loss adding an insulating jacket (roughly $30 or more at hardware stores) can save an additional 7%–16% annually on the appliance's electric bill, per Consumer Reports.
Who benefits most: Households with older tank-style electric or gas water heaters. This step does not apply to tankless or heat pump water heaters in the same way.
Steps:
- Locate the thermostat dial. On electric models it's typically behind one or two access panels on the side of the tank. On gas models it's usually a visible dial near the burner assembly at the bottom.
- Turn the dial to 120°F. If your unit uses labels rather than degrees, check the manufacturer's documentation to confirm which setting corresponds to 120°F.
- Wait 24 hours, then run a hot tap and measure the temperature with a cooking or candy thermometer. It should read between 110°F and 120°F at the tap. Above 130°F, bring the dial down further.
- If the tank feels warm on the outside, wrap it with an insulating jacket according to the package instructions, leaving the thermostat access panel, pressure relief valve, and flue vent (on gas models) clear.
Watch out: Insulating jackets are for standard storage tank water heaters only. Do not wrap a tankless, on-demand, or heat pump water heater the ventilation requirements differ, and wrapping can cause damage or a safety hazard. Verify with your owner's manual before purchasing.
What comes next
The four steps above represent what Consumer Reports identifies as the lowest-effort, highest-return changes available to most households. Together, they can reduce annual energy costs by over $1,000 for a drafty home still running incandescents and an older tank water heater. Homes that have already made some of these changes will see a proportionally smaller combined benefit.
One bonus step that costs nothing extra: clean your HVAC filter while you're adjusting the thermostat. Clogged filters reduce airflow and make the system work harder; clearing them can save around $11 a month, per Consumer Reports.
For homeowners who want to go further, a professional home energy audit can identify improvements worth up to 30% in annual savings roughly $565 a year based on EIA averages, per Consumer Reports. Audits typically cost $200–$700 and are partially offset by a 30% federal tax credit, up to $150. Renters and homeowners in states where it's available can also explore community solar subscriptions, which deliver bill credits of 5%–15% annually with no hardware required, according to Consumer Reports, citing Rewiring America data. Availability varies significantly by state.
Total time across all four steps: a few hours spread over one weekend. Total materials cost starting from zero: under $100.