Audacity uses a plugin approach for effects that modify sounds you've recorded, and the main equalizer plugin is called Equalization. Good settings for this plugin depend on a number of factors, from the voice, instrument or type of program material you're processing to the intended effect of the adjustment.
The Equalization Effect
Video of the Day
Audacity's effects are offline processors. Unlike a home stereo, for instance, in which you can alter bass and treble as your music is playing, Audacity effects are selected, adjusted, previewed and applied to a track. Trial-and-error requires use of the Undo function under the Edit menu, and it is easy to duplicate a track using Ctrl-D. You can then experiment on the copy without affecting the original.
Video of the Day
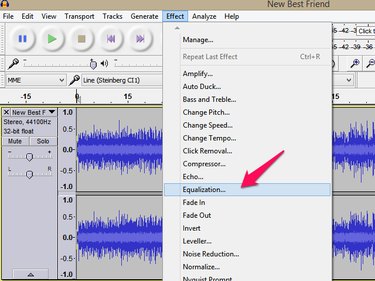
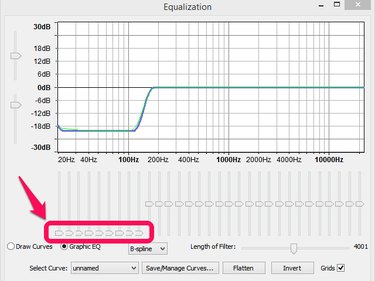
Click Effects and choose Equalization from the drop-down menu. Click the button beside Graphic EQ. This provides an on-screen bank of 31 sliders covering frequencies from low, on the left, to high. Clicking and dragging a slider permits you to change the addition or subtraction of that frequency. When you click a slider or hover over it, its center frequency and amount of change appear in a pop-up to help you with the adjustment. You can hear a short section of your track with the EQ values applied by clicking Preview in the lower left corner. When you have the adjustment you want, click OK to apply the changes to the audio track.
Voices
Spoken Word
Whether for voiceover or podcast, EQ for a speaking voice aims to maximize clarity. Where to apply EQ depends on the particular voice. There are three frequency ranges to consider:
- Fundamental, between 80 and 250 hertz -- the basic "note" of the speaker's voice.
- Vowel sounds, between about 350 and 2,000 Hz -- the region of maximum power of the voice, giving overall shape to words.
- Consonant sounds, roughly 1,500 and 4,000 Hz -- a low power component of a speaking voice, but essential to definition and clarity.
With these ranges in mind, analyze the voice in your recording and plan the EQ changes. Consider these examples:
*
- Some microphones exaggerate low frequencies if the speaker is close, an effect known as bass proximity. Bring this under control using EQ cuts below 125 Hz.
- Boost frequencies between 1,000 and 3,000 Hz for a male with a deep speaking voice without strong articulation of consonants.
- Add EQ around 200 to 350 for a woman with a clear but thin voice.
- For voices with lots of sibilance, the "hiss" that accompanies strong "s" sounds in a voice, look to cuts between 5,000 and 7,000 Hz.
Singing Voices
Many of the principles applying to speaking voices carry over to singers as well, but because the vocal is competing to be heard over instruments, there are a few extra points to consider.
- Remove frequencies below 125 Hz, or the first 9 sliders on the left in Equalization -- vocal content at these frequencies is usually hidden by other instruments.
- If the singer still sounds boomy after reducing the low-frequency content, try a reduction of 6 dB using 250 or 315 Hz, slider 12 and 13 respectively.
- When it sounds as though the singer is in a cardboard box, low midrange frequencies are usually the culprit. Sliders 14 and 15, 400 and 500 Hz are the place to start, also with a 6 dB reduction.
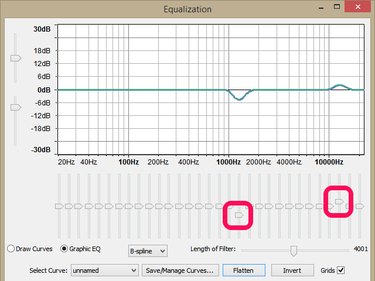
- Nasal-sounding vocals may benefit from reductions between 1,000 and 2,500 Hz. Try reducing sliders 18 to 22 by 6 dB, one at a time, until the unwanted sound is removed. Once you find the frequency closest to the center, adjust the sliders on both sides for further improvement.
- Adding about 3 dB with slider 29, or third in from the right side, produces a boost at 12,500 Hz. This enhances a quality usually called "air," or a sense of space and lightness to the vocal.
Instruments
Adding EQ to instruments depends on context, just as a voice does, whether speaking or singing. Solo instruments generally use more full-range, natural sounding EQ, while instruments in a band setting use a mix of cuts and boosts to fit into their own spaces in an ensemble. Here are some settings for common instruments to try with the Equalization plugin.
- Bass drum -- boost sliders 6 or 7 for deep sound, sliders 27 or 28 for punch.
- Snare drum -- boost sliders 11 or 12 for body and sliders 20 or 21 for crack.
- Cymbals -- reduce stick noise with sliders 8 to 12, increase shimmer with sliders 26 to 28
- Electric bass -- enhance the deepness with sliders 7, 8 and 9 while plucking sounds are boosted at sliders 17 to 20.
- Electric guitar -- amp hum can be reduced with sliders 5 and 6. Boost fullness around slider 12 and bite around slider 22.
- Solo acoustic guitar -- assist fullness or reduce boom with sliders 7 to 12. Add clarity with sliders 21 and 22.
- Acoustic rhythm guitar -- reduce low to mid frequencies aggressively with sliders 1 to 15, while using sliders 20 and up to complement the remaining tracks.
Other Audacity EQ Options
While the Equalization plugin is definitely a versatile workhorse, it's not the only EQ option in Audacity's set of effects. Some EQ tasks are better served with other equalizer tools, so as you become familiar with the EQ changes you prefer to make, consider these other Audacity effect plugins.
- Bass and Treble -- A simple EQ tool that works well for complete mixes, just like your home stereo controls.
- High Pass Filter -- An equalizer that allows high frequencies through while cutting low frequencies. For example, instead of dragging down 15 sliders for an acoustic rhythm guitar, choose the High Pass Filter, set the Cutoff frequency to 500 Hz and select a Rolloff amount. Drag the Cutoff frequency slider to fine-tune your result.
- Low Pass Filter -- An equalizer that cuts frequencies above the cutoff frequency, but otherwise works the same way as the High Pass Filter. For example, a bass guitar with excessive finger noise may be improved by setting the Cutoff frequency around 2,500 Hz.
- Notch Filter -- An equalizer that focuses on a problem frequency on an otherwise good-sounding track, helping to reduce that frequency. A guitar with excessive hum, for example, may benefit from a notch filter with Frequency set at 60 Hz, just as with the Equalization plugin. The Q setting narrows the cut, or notch, focusing on the problem frequency.