
Most desktop computers -- and practically every laptop -- produced in the last decade have a Wi-Fi adapter. Older computers may have a Wi-Fi sticker somewhere on the case, or even a small antenna jutting out from the back of the case. If your PC doesn't seem to have Wi-Fi, chances are that the adapter is malfunctioning or that it's been turned off.
In most cases, you can fix a problematic Wi-Fi adapter yourself without having to open the case. If there is no Wi-Fi adapter indicated in Windows Settings, in the Device Manager or in the Control Panel, you may not have a Wi-Fi adapter, or it may be physically defective and need repair.
Video of the Day
Video of the Day
Activating Wi-Fi
Step 1
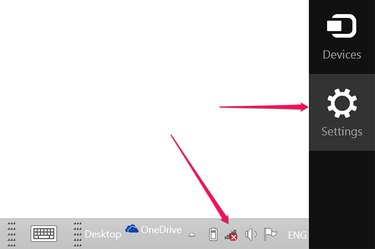
Look at the taskbar at the bottom of the Windows 8.1 desktop. If you see a staircase-shaped icon, your computer does have a Wi-Fi adapter. If there is a red "X" on the icon, the Wi-Fi has been disabled. Click this icon.
If the Wi-Fi icon isn't visible in the Taskbar, swipe the cursor upward from the bottom-right corner of the screen and click "Settings."
Step 2
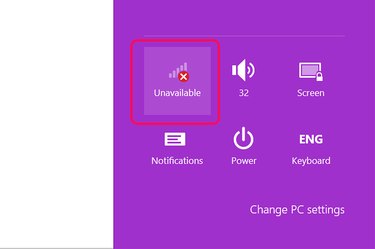
Click the staircase-shaped "Wi-Fi" icon in Settings. If the icon isn't there, use the Device Manager to look for your computer's Wi-Fi.
Step 3
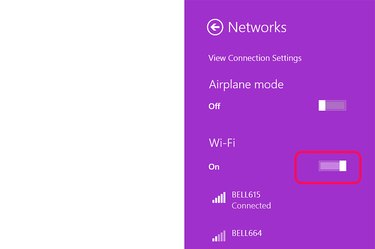
Click the Wi-Fi "On/Off" toggle to turn on Wi-Fi. Select a Wi-Fi network from the list that displays if your computer doesn't connect to your network automatically.
Using Device Manager
Step 1
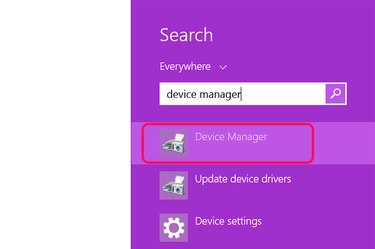
Launch Device Manager. To do this, type "device manager" in Windows Search and press the "Enter" key.
Step 2
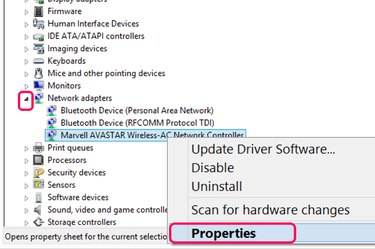
Click the small arrow beside "Network Adapters." This reveals all of the network adapters, including Ethernet, Bluetooth and Wi-Fi. Right-click the device that includes "wireless" in its name and select "Properties."
Step 3
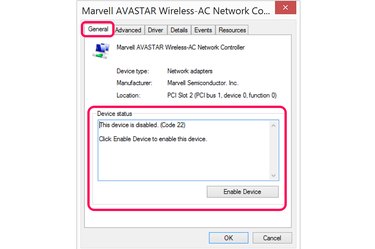
Read the message in the "Device Status" section under the General tab. Follow any instructions provided in this field, such as clicking the "Enable" button or updating the device driver.
Troubleshooting in Control Panel
Step 1
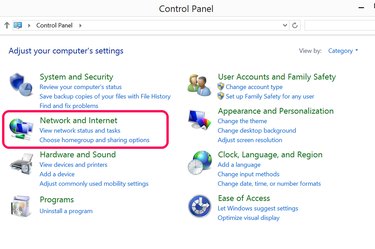
Launch Control Panel. Click "View Network Status and Tasks" in the Network and Internet section. Click "Troubleshoot Problems."
Step 2
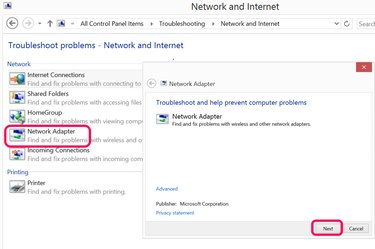
Click "Internet Adapter." A small troubleshooting window opens above the Control Panel window. Click the "Next" button. Windows scans for all network adapters, including Wi-Fi adapters.
Step 3
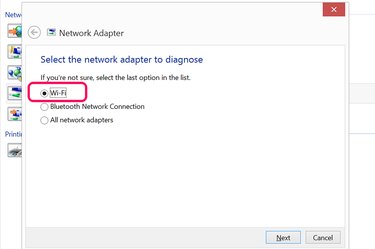
Select "Wi-Fi" from the list of adapters. Click the "Next" button to allow Windows to diagnose any problems with the Wi-Fi adapter. Follow any onscreen prompts that appear during this diagnostic process.
Step 4
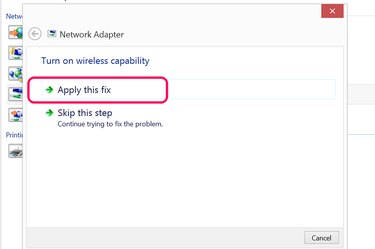
Click "Apply This Fix" when prompted and follow any additional instructions. If this doesn't fix the problem, run the troubleshooter again. If Windows is unable to correct the problem or provide you with instructions for doing so, you should take the computer in for repair.