Windows 8.1, 8 and 7 automatically index your documents and their locations so the search function can return results more quickly -- this is generally a good thing, unless it starts to cause problems. Indexing data is stored in an EDB database file called Windows.edb. This file is usually a gigabyte or two in size, but sometimes it can become quite large: sizes of 50GB or more have been reported. You can delete this file without damage to your computer. After deletion, the index file is automatically rebuilt unless you disable indexing completely. Before you delete the file, first disable Windows Search (at least temporarily) to avoid error messages. After you've deleted the index file, you then can customize Windows indexing options -- for instance, to limit the directories it indexes. Additionally, install a Microsoft update to ensure your indexing file does not become unnecessarily bloated. Alternatively, you can disable Windows Search indexing completely so the file is not rebuilt at all.
Disable Windows Search Indexing
Video of the Day
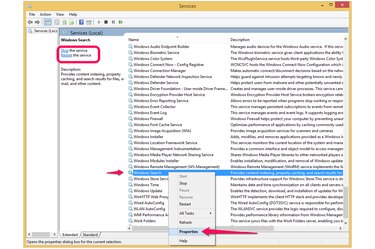
Disable the Windows Search service via the Services panel in Administrative Tools. Search for and select "Administrative Tools" on the Start screen and then select "Services" from the list of Administrative Tools to open the Services panel. Find and select "Windows Search" and click "Stop the service" in the left pane. This stops the service for this Windows session, which is all you need in preparation for deleting the index file. To stop the service completely so it does not start up again when you reboot Windows, instead scroll down in the Services panel and double-click on "Windows Search" to open its Properties dialog. Select "Disabled" from the drop-down menu under "Startup Type." The service will not start up the next time you reboot. Disabling indexing does not affect your ability to use Windows Search, but a warning dialog may launch informing you that certain services are affected, most commonly the Windows Media Player Network Sharing Service.
Video of the Day
Delete the Windows Search Index File

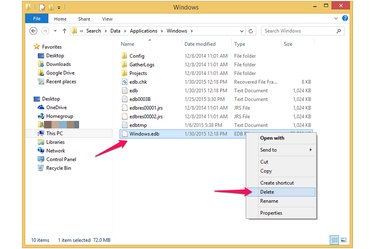
You have two ways to delete the Windows Search index file: by deleting it explicitly in File Explorer, or by using the Indexing Options "Advanced Options" dialog to rebuild the index, which first deletes the existing file before it rebuilds it. To delete the file without rebuilding it, navigate to it in File Explorer -- it's located in a hidden Windows directory at C:\ProgramData\Microsoft\Search\Data\Applications\Windows\Windows.edb. Because it is hidden, first check "Hidden Items" in the Show/Hide section under the View tab in File Explorer so Windows displays hidden directories. You need administrative permissions to access these directories, and may be prompted to confirm the decision. Navigate to the Windows directory in the location above. Right-click the Windows.edb file and select "Delete," or drag it to the Recycle Bin. After deleting the file, if you have not permanently disabled Windows Search, subsequent searches will be slower while Windows rebuilds the file.
Customize Indexing Behavior
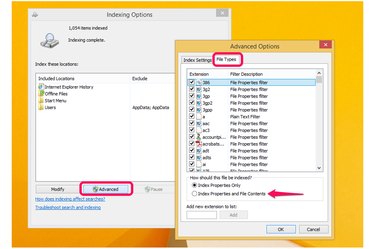
By default, Windows indexes all documents in your libraries, such as Documents, Music and Pictures, as well as other common files including email, browsing history and offline files. You can customize indexing locations by either deleting folders or adding them. On the Start screen, search for and select "Indexing Options" to open the Indexing Options dialog. This dialog offers a veritable cornucopia of customization options -- clicking "Modify" opens the Indexed Locations dialog where you can view all the indexed folders. Press "Show All Locations" -- you must have administrative access to click this -- for a detailed list of each file and folder indexed. Use the "Change Selected Locations" section to de-select or select folders for indexing. Close the "Indexed Location" dialog to return to the Indexing Options dialog, where you can select an "Advanced" button to open the Advanced Options dialog. Here's where the really powerful indexing options come in: you can choose to index not only file locations but also their contents, add a new file type to be indexed, index encrypted files, change the index file location and delete and rebuild the index.
Fix the Indexing Service Bloating Issue
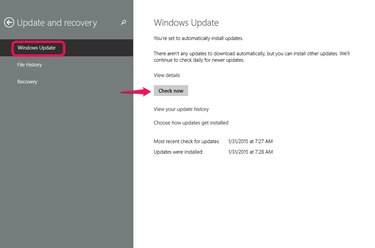
Windows 8 and Windows Server 2012 users may experience an issue that causes their index file to bloat and use a large amount of disk space, up to 50GB according to Microsoft. The provided update fixes several issues in addition to this one and is installed automatically if you have "Install updates automatically (recommended)" turned on in your Windows Update Setting. If you don't think you have this update, search for "Windows Update" and select "Check for Updates."
- The Windows Club: Windows.edb file in Windows 8
- Windows 7 Themes.Net: What is Windows.edb? Can I Delete It Or Change Its Location?
- Addictive Tips: How To Permanently Disable Search Indexing In Windows 8 [Tip]
- Windows: Improve Windows searches using the index: frequently asked questions
- TekRevue: Modify Windows Search Indexing Options to Search File Contents
- Microsoft Support: Windows 8 and Windows Server 2012 update rollup: May 2013
- Microsoft Support: The Windows.edb file grows very large in Windows 8 or Windows Server 2012
- The Windows Club: Windows 7 / 8 Search Indexer Tips