There's nothing wrong with removing a watermark from any image that you own. To do this properly, you should use an advanced image editing app like Adobe Photoshop CC, Corel PaintShop Pro X7 or GIMP 2.8. The process is essentially the same for each of these apps, although the tool names, locations and buttons vary slightly.
Cropping Out a Watermark
Video of the Day
When a watermark is close to the edge of a photo, the best course of action is usually just to crop it out. Advanced image editing apps like Photoshop, GIMP and PaintShop Pro all have a cropping tool. Simply select the Crop Tool and drag the edges so that the watermark isn't visible and press Enter.
Video of the Day

Healing Watermarks
Examine the watermark to determine the best technique to remove it. If the watermark is very small, or if the letters are very thin, you can often use a healing tool to remove it.
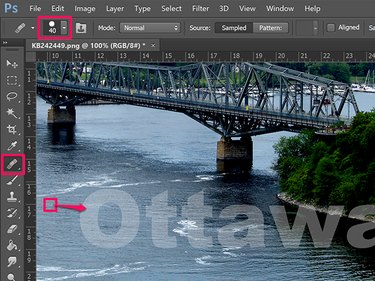
Select the healing tool and adjust its size in the Options menu so that it's about the same size as the thickness in the letters of the watermark. Identify a source area that can be used to paint over the watermark. Select an area with similar colors, tones and textures as the portion of the photo covered by the watermark.
- In Photoshop, use the Healing Brush Tool in the Toolbox. Alt-click a source near the watermark to select it.
- In PaintShop Pro, use the Magic Fill Tool in the Tools toolbar. Right-click the source area.
- In GIMP, use the Heal tool in the Toolbox. Ctrl-click the source area.
Drag the tool over the letters in the watermark. The tool applies data from the source pixels to remove the watermark. Sometimes a healing brush leaves blurred pixels or discolorations behind. To clean up these areas, select a different source point and apply the healing tool again.
Advanced Techniques
If the letters or symbols in the watermark are quite thick, or if there are few areas with similar pixels around the watermark, trying to eliminate them with a healing tool alone won't always be effective.
Instead of thinking in terms of erasing or removing the watermark, approach the project as if you were camouflaging the watermark to make it nearly invisible. This takes more time, but usually results in a better quality end result.
Step 1: Isolate the Watermark
Select the watermark using your favorite selection tool, like a Lasso Tool, or the Freehand Selection Tool in the case of PaintShop Pro. Copy the selected area and paste it into a new layer by pressing Ctrl-C and Ctrl-V. Use the Eraser Tool with a small brush size setting to erase the pixels around the watermark, leaving only the watermark behind.
Merge the watermark layer back into the background. In Photoshop and PaintShop Pro, merge options are under the Layers menu. In GIMP, the merge options are under the Image menu bar.

Step 2: Adjust the Levels
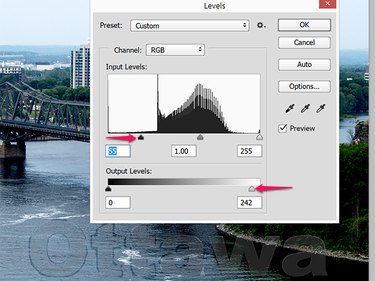
While you can use tools like Brightness and Contrast, or even Curves, to darken a light watermark or lighten a dark watermark, the most effective results are obtained with Levels. Levels allow you to fine-tune both input and output levels with a high degree of control.
- In Photoshop: Select Adjustments from the Image menu and select Levels.
- In PaintShop Pro: Select Brightness and Contrast from the Adjust menu and click Levels.
- In GIMP: Select Colors from the Image menu and click Levels.
Adjust the input and output levels until the watermark is as close to the background colors and tones as possible. For a pale watermark, this means lightening the input levels while darkening the output levels.
Step 3: Use the Clone Tool
The Clone Tool works similarly to the Healing Tool, except that all of the source pixels are copied to the destination. The Clone Tool is available in the Toolbox in both Photoshop and GIMP. In PaintShop Pro, the Clone Brush tool is in the Tools toolbar.
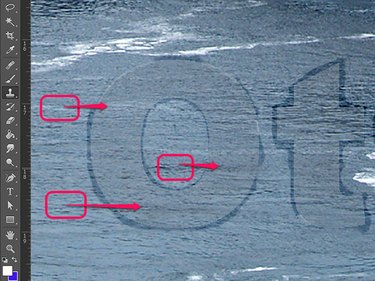
It's with this tool that thinking in terms of creating camouflage really pays off. Select a source point, just as you would with the Healing tool, and then drag across the watermark with a single short stroke. Select another source point and add another stroke. Instead of trying to erase the entire watermark, use the Clone Tool to break up its pattern.
In the example below, we used about a dozen short strokes over the letter O alone, from a dozen different source points. Most of the letters were cloned, but not completely.
Step 4: Apply and Reapply as Needed
Zoom in and out of the photo to make sure that no traces of the watermark are visible. If you are able to make out a portion of a letter, zoom back in and apply the Clone tool again as needed, and then zoom back out again. You may have to do this several times, depending on the size and complexity of the watermark's symbols.