Aiming a Slimline Dish is a process that does not take a trained professional or any prior knowledge of satellite dishes or their installation. As long as you have a wrench on hand and preferably a friend to make the process move more smoothly, your Slimline Dish can be hooked up to its satellite receiver and properly aimed to receive satellite programming in only a few steps, although some guess-and-check with the aiming process is certainly required.
Step 1
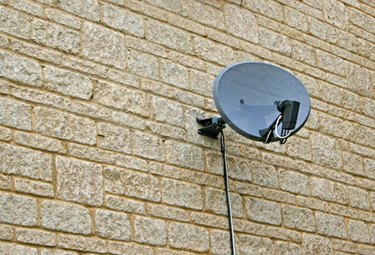
Check the mounting area where the Slimline Dish will be installed. Make sure it is free of any obstructions. Look at the skyline surrounding your mounting area and ensure there is nothing that could block satellite signal reception, such as power lines, trees, structures or tall buildings. A clear view of the southern sky for a direct line-of-sight access to the satellite is required.
Video of the Day
Step 2
Point the Slimline Dish toward the southern sky. Aim the dish in a general direction, as precise adjustments will be performed later on.
Step 3
Connect the Slimline Dish's satellite receiver to your television. First, take note of the connectors on the back of your TV and the back of your satellite receiver. There will be a set of three connectors on each that are red, white and yellow in color. Notice the standard audio/video (A/V) cables that shipped with the receiver have a set of "RCA-type" plugs on both ends, and these are also red, white and yellow in color. Connect these plugs to the jacks on the TV and the satellite receiver, matching each plug's color with its color-matching jack.
Step 4
Connect the coaxial cable to your satellite receiver. This cable runs directly from the Slimline Dish and should be plugged into the "ANT IN" port on the back of the satellite receiver. Once connected, turn on both the receiver and the TV and wait for the menu to load up. Then, select the "signal meter screen" option. Have a friend stay with the meter screen as you return to the Slimline Dish.
Step 5
Adjust the elevation (up/down movement) of the Slimline Dish. To do so, loosen the nuts that are located right by the elevation bolts on the Slimline Dish with a wrench (your Slimline Dish will come with a manual that gives a pictorial diagram of the location of the key nuts/bolts on the dish). With the nuts loosened, make slight up/down adjustments to the dish, and after each adjustment wait for a report from your friend viewing the signal meter screen. The screen will provide coordinates and instruct your friend as to how close you are to hitting each with your dish adjustments.
Step 6
Adjust the azimuth (left/right movement) of the Slimline Dish. To do so, loosen the LNB dish arm nuts with your wrench. Then, make slight left/right adjustments to the Slimline Dish and again have your friend check the TV display. Once you have hit the coordinates and an overall reading of 70 to 80 is provided by the signal meter screen, the Slimline Dish is correctly aimed.
Video of the Day