
Taking the perfect selfie is harder than it looks. From lighting issues to skin blemishes to your own limited arm span, there are often numerous things at play that prevent you from putting your best face forward, so to speak. Before you share another so-so smartphone self-portrait on social media (or relegate it immediately to the trash), learn how to look better in selfies with a few easy (and mostly free) tricks of the trade.
1. Seek natural light
Video of the Day
Natural light is always the most flattering, so whenever possible, snap your selfies outdoors. However, shooting outdoors has its challenges, too. Bright midday sun can cause squinty eyes, harsh shadows, and blown-out highlights, so position yourself with the sun behind your head. You'll be back-lit and your hair will look like it's glowing, which is always much prettier than squinting.
Video of the Day
Alternatively, you can stand in the shade of a building or a tree. Watch out for unflattering spotty light that's filtered through tree branches -- the bright spots will always overexpose and look far too bright in the photo.
Stuck inside? Take advantage of natural light coming in from outside by taking your selfie while facing a window or standing in an open doorway.
2. Make artificial light work for you
If you're indoors and can't find any natural light -- say, you work in a cubicle or it's already dark outside -- try experimenting with different lamps and overhead lights, a tip that comes from Donna Kim, Lifestyle and Beauty expert and creator of DonnaDaily.com. Lightbulbs can produce a variety of color temperatures, some of which are more flattering for skin tones than others. Then, when you're ready to say "cheese," face the light source instead of blocking it with your body for a soft, even glow.
3. Turn off the flash
The flash is not your friend. Unless you like how selfies look when you're overexposed and the background is pitch black, remember to turn off the flash on your camera before aiming it at your face. Camera flashes work best to brighten objects at an intermediate distance, but when used close up, their intense light will almost always wash you out.
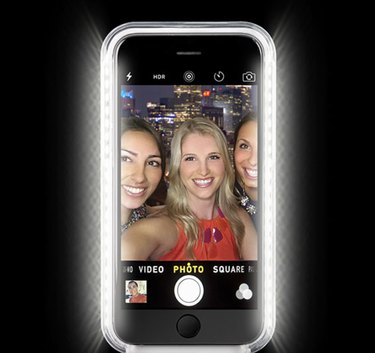
If you're frequently snapping selfies in dark places or outside at night, you might want to invest in a phone case that lights up. One popular choice is LuMee, which features dimmable LED lights on the left and right sides for soft, even illumination.
4. Set the exposure and white balance
Your phone's built-in camera should allow you to adjust the exposure simply by tapping on the screen. If the box that measures the exposure is positioned on something dark like a navy shirt or a shadow, the image will auto-adjust and become brighter. If it's hovering on something bright, the image on your screen will get darker. For that just right exposure in your selfie, tap the screen so that the box is centered on your face.
There are also camera apps like Camera+ and Open Camera that enable you to make other manual adjustments like the focus point and white balance, giving you more control over how your selfie turns out.
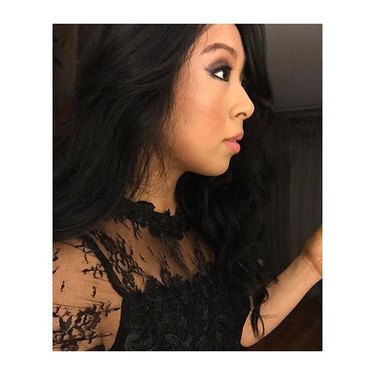
5. Find your best angle
It's amazing what a difference a simple tilt of the head can make. Take a couple of practice shots, moving your face left and right and then lifting and lowering your chin a bit until you find your most flattering angle. We all have a side of our face that looks better than the other -- even supermodels.
Instead of holding the camera slightly above your head, which Kim says can work when you're taking a group selfie but looks awkward for a solo shot, hold the phone directly in front of you with one hand. Don't look at the screen, though. Instead, look straight into the camera lens or, for a more moody selfie, off to the side.

6. Use an alternative shutter release button
Your phone's front-facing camera probably has a lower resolution than the back camera, so selfies never look quite as sharp as traditional photos. Unfortunately, it's even worse: tapping your phone's on-screen shutter button, the easiest way to take a photo, creates some jiggle -- and that can introduce blur.
A popular alternative is to use your phone's side volume buttons. Not only do they almost feel like you're pushing the shutter release on a real camera, but they make it much easier to snap a one-handed selfie.
Here's a tip for iPhone users: If you're wearing your phone's earbuds, you might be happy to know that the volume buttons are usually also another camera shutter release.
7. Move the camera farther away
When taking a selfie, it helps to put as much distance as possible between yourself and your phone as possible, as smartphone cameras tend to create lens distortion when held too close. Obviously, if you're trying to take a self-portrait that includes more than just your face, simply holding the phone at arm's length isn't going to cut it. That's when gadgets like selfie sticks comes in handy. (That is, if you feel comfortable using a selfie stick in public).

There are also small tripods and phone stands that let you position your phone on a tabletop to take the picture. Depending on your location, a mini tripod (or even just leaning your phone against a larger, heavier object) could also work. Download a self-timer app or invest in an inexpensive camera remote to be sure you're in position before the shutter releases. (And don't forget that iPhone earbuds can serve as a free remote control!)
8. Ditch the duck face
A few years ago, it was trendy to look like you were sucking on a lemon in your selfie, also known as "duck face." As the name suggests, it turns out that pursing your lips together and outward wasn't particularly flattering. Remember that an easy, authentic smile almost always looks better in selfies than duck face or fish gape or sea otter smile whatever the next popular facial expression turns out to be.
But if smiling into your front-facing camera feels forced, try this tip from a photographer: Give a little chuckle before hitting the shutter release button. You'll find it that it's hard to laugh without breaking out into a smile.
9. Use photo editing apps
Despite your best efforts to shoot with proper lighting and only capture your good side, sometimes selfies need to be fine-tuned in post-production. Photo editing apps can brighten dark images, add more saturation, and change the hue of a photo. Donna Kim, for example, loves Snapseed (available for iPhones and Androids) to brighten the ambience on her selfies.
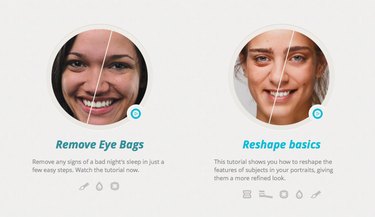
There are even photo editing apps that can remove blemishes, smooth skin, add volume to hair, or even add mascara and lipstick to a bare face. The Kardashians reportedly use Facetune to edit their selfies, a powerful and somewhat-complicated app available in iTunes and Google Play. Photo Editor by Aviary, another popular iOS and Android app, can fix redeye, vanish pimples, and whiten teeth.
10. Add on a filter
If you aren't interested in making nitty-gritty changes like adjusting curves or using a clone tool to create clear skin, you can quickly change the look of your selfie by adding a filter. Instagram offers it's own set of filters, but many expert selfie-takers prefer using VSCO. Another fun choice is A Color Story, which features more than 100 filters, plus light leaks, flares, and color fogs.