A background on a picture in Microsoft Word can be removed using the Remove Background feature. Eliminate an image background to allow the page background color, text or another image underneath that part of the picture to show through. Microsoft Word provides the tools to remove the background from clip art and photographs without leaving the program.
Remove a Background From Clip Art or a Photograph
Video of the Day
In this example, the butterfly images are on a page in a Microsoft Word document that has a blue background. When the white background is removed from each picture, the blue background of the page shows through.
Video of the Day
Step 1: Find the Remove Background Option
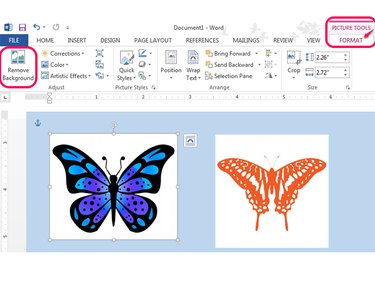
Click to select the picture on which you want to remove the background. Under Picture Tools, click the Format tab. This tab appears when a picture is selected. Click Remove Background.
Step 2: Select Background to Remove
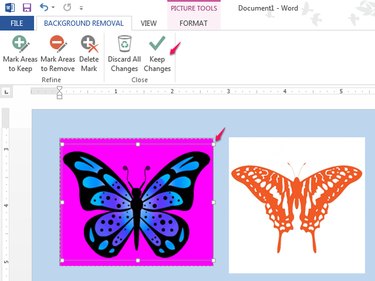
A bright magenta color indicates color to be removed, and a marquee is positioned to get you started with an area selection. Click and drag the white handles of the marquee to position the rectangle around the section of the picture that you want to keep intact. Make sure that all wanted parts of the image are included within the rectangle. Click Keep Changes or press Enter. In the blue butterfly picture, only the white background is removed.
Step 3: Fine-Tune the Details
When the color you mark to remove also appears within then image, those areas are removed along with the background unless you mark them as areas to keep. If not marked, they are removed and the blue background shows through. Use the Mark Areas to Keep or Mark Areas to Remove options in the Background Removal tab to control details of the removal as needed.
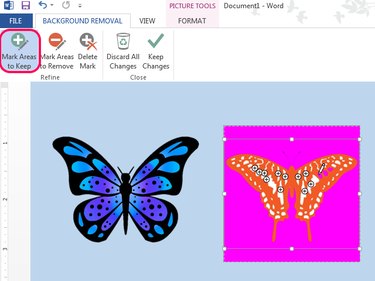
When you click Mark Areas to Keep a pencil icon appears. Use the pencil to click on any section marked magenta to retain its original color in the picture. A small plus symbol appears to indicate areas to keep and a minus symbol indicates removal. Click Delete Mark to remove a mark. Select Discard All Changes to restart the area selection process. Click Keep Changes or press Enter to complete the process.
Step 4: Elaborate Background
If the image contains an elaborate background rather than a simple solid color, you can still use the Remove Background tool. Part of a photograph can be separated from its surrounding content. The ease of removing the background depends on the composition of the photograph and the part you want to extract.

For best results, position the marquee completely around the part you want to keep as tightly as possible. Use the Mark Areas to Keep and Mark Areas to Remove to refine your selection. Elaborate photos may require more detailed editing.
Step 5: Review Results
Examine the picture when done. Look for areas that were removed unintentionally. Select Undo from the Edit menu or press Ctrl-Z to go back.