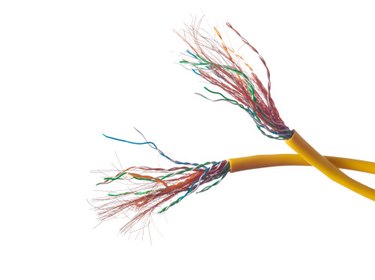
If you are attempting to use CAT5 cable for speakers, you are probably dealing with a situation where the wire is already laid and you want to save some time in an effort to connect speakers in another room to a "speaker B" output on a home amp. Or you may be installing a 70V audio distribution system with existing CAT5 in a business or institution. CAT5's advantages for standard speaker hookups are controversial, but it is superb for 70V systems: individually insulated twisted pairs are designed to reduce crosstalk. CAT5 has eight wires, configurable for mono or stereo.
Connecting CAT5 to 8-Ohm or 4-Ohm speakers
Video of the Day
Step 1
Use a CAT5 wire stripper to take off the outer insulation sleeve. If you're connecting two speakers (stereo), remove enough sleeve to fan out two pairs of wire bundles in different directions, however far apart the speakers are located.
Video of the Day
Step 2
Strip 3/4 inch of insulation off each wire conductor.
Step 3
For a one-speaker-to-amplifier connection, twist together green/green-white with brown/brown-white for the negative speaker lead, and orange/orange-white with blue/blue-white for the positive lead. For stereo speakers, use green/green-white for left negative and orange/orange-white for left positive. Use brown/brown-white for right negative and blue/blue-white for right positive.
Step 4
Terminate the wires and connect to the speakers, then the amplifier.
Using CAT5 to connect 70V distribution speakers
Step 1
Follow Steps 1 through 3 in Section 1 using the same color combinations for a single channel or for stereo.
Step 2
For each audio channel, terminate each negative and positive bundle with crimp-on terminals appropriate to the amplifier, attach negative to the common tap and positive to the 70V tap of each amp channel.
Step 3
Repeat Step 2 on the screw terminals of each room speaker attenuator, attaching negative to "common in" and positive to the other input terminal. Daisy-chain connect additional attenuators for each additional speaker on each channel.
Step 4
For each channel, run standard speaker wire between the attenuators' output terminals and the 70V speakers' transformer primary leads, observing proper polarity.