Connecting your computers to your home network grants access the Internet, networked printers and attached devices and other computers on the network. Most networks in the home or workplace are Ethernet wired networks or Wi-Fi wireless networks. How you connect to a network and what equipment you need depends primarily on the network connection you're setting up.
Necessary Equipment
Video of the Day
If you're setting up a wired network, you need an Ethernet modem, a router -- unless your modem has a built-in router -- and Ethernet cables. If you're setting up a wireless network, you still need an Ethernet modem and a wireless-enabled router, as well as an Ethernet cable to connect the two. You also need one wireless adapter per computer, unless your computer has a built-in wireless card.
If you're building a hybrid network involving both wired and wireless connections, a wireless router is the best choice, as they usually also have Ethernet ports. Some modems feature built-in wireless routers, making them a good all-in-one device choice if you have limited space.
Video of the Day
Wired Connections
- Connect the Internet coaxial or DSL cable to your modem's Internet or Cable port.
- Connect the modem to the router's Internet, Modem or WAN port with an Ethernet cable. Skip this step if your modem has a built-in router.
- Connect an Ethernet cable between each computer's Ethernet port and one of the open ports on the router or modem.
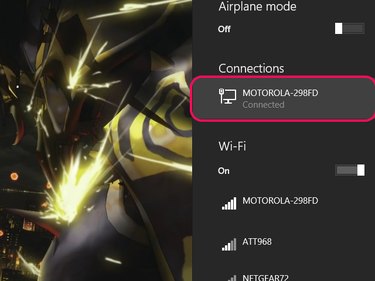
- Click the Network icon in the System Tray and check for the wired connection.
- Start a Web browser and connect to a website. If the site loads, your connection is complete. Otherwise, consult your modem and router's user manuals to see if further setup is required.
- Pro: Wired connections offer faster and more stable connections than wireless.
- Pro: Wired-only networks are generally more secure than wireless, as unauthorized users have to directly connect to the router in order to gain access to the network.
- Pro: Ethernet cables are less expensive than wireless adapters.
- Con: Wired-only networks have limited range compared to wireless. While this situaiton can be mitigated with longer Ethernet cables, you have to run wires throughout your home to access the Internet from any room.
- Con: The number of computers that can connect to the router is limited to the number of available Ethernet ports.
Wireless Connections
- Connect the Internet coaxial or DSL cable to your modem's Internet or Cable port.
- Connect the modem to the router's Internet, Modem or WAN port with an Ethernet cable. Skip this step if your modem has a built-in router.
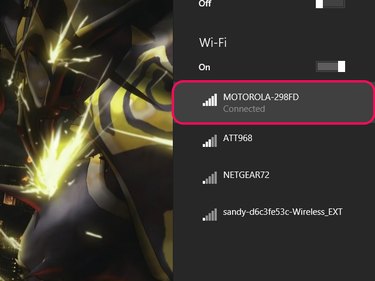
- Click the Network icon in the System Tray and find your wireless network in the list.
- Select your network and click Connect. If you want your computer to automatically connect to this network when you start it up, fill the Connect Automatically check box.
- Enter your wireless network's security key when prompted.
- Start a Web browser and connect to a website. If the site loads, your connection is complete. Otherwise, make sure the security key you entered is correct, then check signal strength and whether further set-up is required according to your user's manual.
- Pro: You can take your computer to most rooms of your house without having to route Ethernet cables through your home.
- Pro: The only Ethernet cable required is the one running from your modem to your router, assuming your modem doesn't have a built-in router.
- Con: Wireless connections aren't as fast as wired connections, as they have to transmit bandwidth over the wireless signal.
- Con: The design of your home and nearby electronics can interfere with a wireless signal, weakening or even completely blocking your connection.
- Con: Without a security key, your wireless connection can be detected and used by anyone -- including cyber-criminals engaged in illicit behavior, which may be traced back to you.
Homegroups
A Homegroup is a network used by Windows to connect your computers together and share files. After you create a Homegroup, your other computers and devices like printers can be added to it.
Creating a Homegroup
- Press Windows-X on your keyboard and select Control Panel from the power user menu.
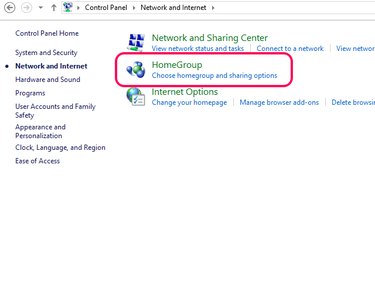
- Select Network and Internet, followed by Homegroup.
- Click Create, followed by Next.
- Select the libraries, devices and files you want to share with other computers on the network, then click Next.
- Write down the Homegroup password when it's presented and click Finish.
Adding Computers to the Homegroup
- Sign onto the computer you're adding.
- Press Windows-X and select Control Panel.
- Select Network and Internet, followed by Homegroup.
- Click Join now, followed by Next.
- Select the libraries, devices and files you want to share from this computer, then click Next.
- Enter the homegroup password and click Next, then Finish.
Adding Printers
- Sign onto the computer to which your printer is installed/connected.
- Follow the steps to join a homegroup listed above.
- Set the Printers & Devices permission to Shared.
- Microsoft: Setting Up a Home Network
- Cox Cable: Connecting a Router, Cable Modem and Primary Computer
- Linksys: Connecting Devices to a Linksys Router Using an Ethernet Cable
- 7Tutorials: How to Connect to Wireless Networks in Windows 8 and Windows 8.1
- Geek Squad: Connecting to Wireless Networks in Windows 8
- Microsoft: Homegroup from Start to Finish