Most good photo editing apps, like Paintshop Pro, Photoshop and GIMP can resize an image. If you don't have any of these, use Microsoft Paint which comes with Windows 8.1. However, if you see any photo editing in your future, you can download GIMP for free.
If you have Outlook installed on your Windows 7 or Windows 8.1 computer, you can use Windows Photo Viewer to quickly resize a photo to send as an email. Once it's resized, you don't even need to use Outlook to send it.
Video of the Day
Video of the Day
Windows Photo Viewer
Step 1
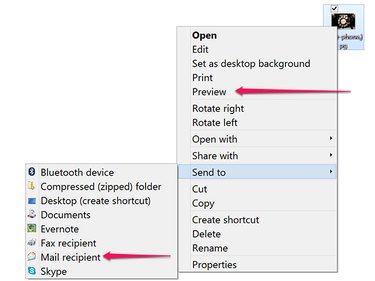
Right-click a photo in File Explorer or on your desktop. Select Preview from the drop-down menu to open the photo in Windows Photo Viewer. This isn't the only way to open the photo in Windows Photo Viewer. You can also click Send To and then Mail Recipient, or select Open With and then Windows Photo Viewer.
Step 2
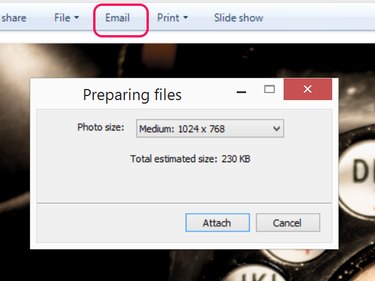
Click the Email button. Click the Photo Size menu to change to specify a size. Note that the dimensions, measured in pixels, are estimates.
- Large: 1280 x 1024
- Medium: 1024 x 768
- Small 800 x 600
- Smaller: 640 x 480
- Original Size.
Resizing a photo won't change the photo's aspect ratio or make it larger than it already is. For example, if you resize a 1200 x 1200 pixel image to Medium, the resulting image is actually 768 x 768 pixels, not 1024 x 768. Resizing a 400 x 400 pixel image to Large leaves you with the same 400 x 400 pixel image.
Click Attach. Outlook opens a new Message window with the reduced image already attached.
Step 3
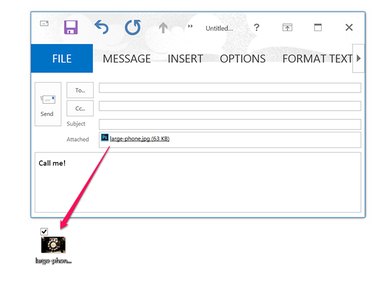
Send the attachment using Outlook by entering a recipient name and a message and clicking Send. If you don't want to use Outlook, just drag the attachment onto the desktop. You can then send the resized photo using any other email client or service.
Microsoft Paint
Step 1
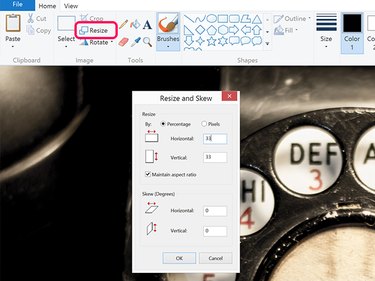
Right-click the photo in File Explorer, click Open With and select Paint. Click the Resize icon. Reduce the image size by a percentage, or click the Pixels radio button and reduce the pixel dimensions. By default, the Maintain Aspect Ratio box is checked, so you need to change only one dimension. Changing the Horizontal or the Vertical dimension automatically changes the other to the equivalent size based on the photo's aspect ratio.
Step 2
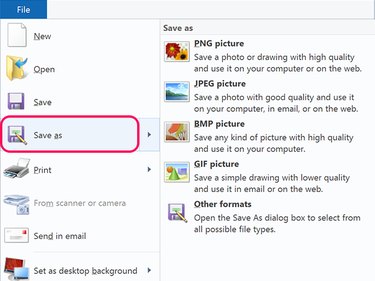
Click the File menu, select Save As and select PNG, JPEG, BMP or GIF format. To save the photo in a less-common image format, like a TIFF, click the Other Formats option.
GIMP
Step 1
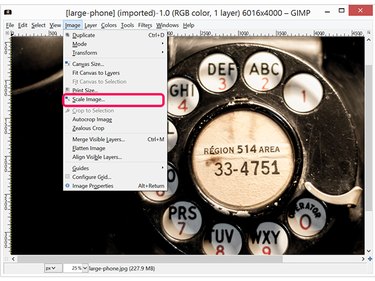
Open the photo in GIMP. Click the Image menu and select Scale Image.
Step 2
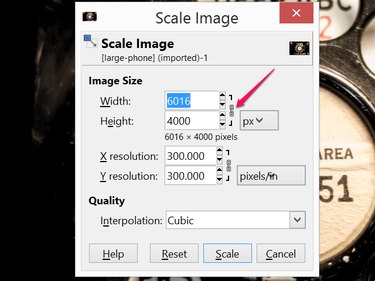
Click the Measurement icon and change it from Px -- for pixels -- to Percentage or any other unit of measurement you prefer. By default the Lock icon is closed, indicating that the aspect ratio is locked. Change the Width or the Height to any size you need and click Scale.
Step 3
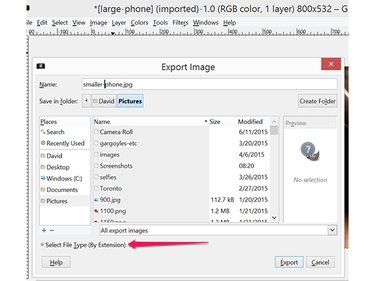
Select Export As from the File menu. By default, images are exported in JPG format, but you can change this by clicking the Select File Type option. Export options include PNG, GIF, BMP and some formats you probably have never heard of.