Many photos and Web images are stored in the popular JPEG image format. But JPEG images have some limitations; some applications work best with images in vector formats such as Scalable Vector Graphics and Encapsulated Postscript.
Bitmap vs. Vector Images
The difference between JPEG and vector image files is in how the image is stored and displayed.
Video of the Day
Video of the Day
Bitmap format
A JPEG file stores the image in what's called a raster or bitmap format. In a bitmap format, every individual pixel or dot in the image contains a specific color; when you combine all the dots together they combine to form an image that you see as a single picture rather than as the individual dots. But since there are only a certain number of dots in an image, if the image is displayed in a larger or smaller space than intended, the image loses resolution and becomes fuzzy. Bitmap images are easy to create when taking photos or using drawing tools, but can't always be used when a larger image is needed.
Vector format
A vector image, instead of storing individual dots, stores equations that describe all the different lines and areas in the image. When the image is displayed, the equations are used to draw all the lines and areas to fit whatever space the image is displayed in. So although vector images don't always contain as many small details as bitmap images (especially large bitmap images), even very small vector images can be scaled to almost any size without losing resolution. Because they scale so well, vector images are often used for logos and other design work in programs such as Adobe Illustrator.
Conversion Applications
Most professional graphics applications such as Adobe Illustrator can convert bitmap images to vector images, but require a paid license. Free applications that convert bitmap images into vector images include browser applications such as Autotracer and VectorMagic, and desktop applications like Inkscape.
Inkscape is a free and open source application that edits vector graphics files in multiple formats. Inkscape also has a built in bitmap image to vector image converter, so you can use it to convert your JPEG images into vector images. Follow the steps below to convert your JPEG image to vector format using Inkscape.
Convert Your JPEG File with Inkscape
Step 1: Import the JPEG file
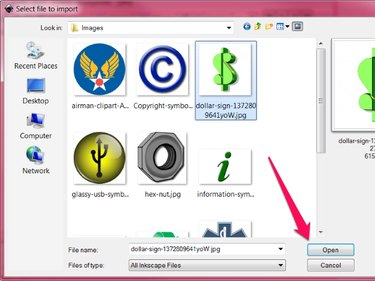
1. Open the File menu and select Import... from the menu. Select your file.

2. Select the JPEG file to be converted and press the Open button.
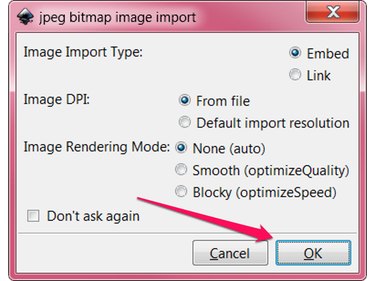
A jpeg bitmap image import dialog opens with options to use for the import. The default options work well for most images, so if you're not sure what options to select don't change any of the options.
3. Press the OK button.
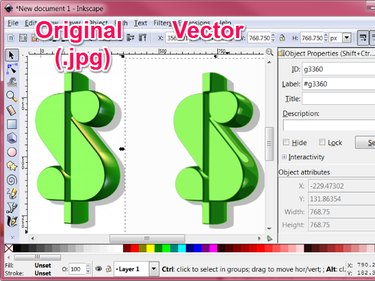
Inkscape displays the JPEG image, selected in the main window.

Step 2: Convert the Image to Vector Graphics Format
1. Click on the Path menu and select Trace Bitmap....
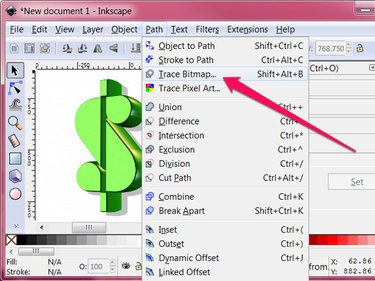
The Trace Bitmap dialog opens.
2. Click the Live Preview check box to see how the traced image will look with the selected options.
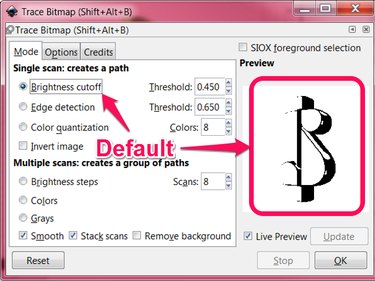
3. Select the Colors radio button under the Multiple scans creates a group of paths section of the dialog.
The Preview changes to display a higher quality color version of the image.
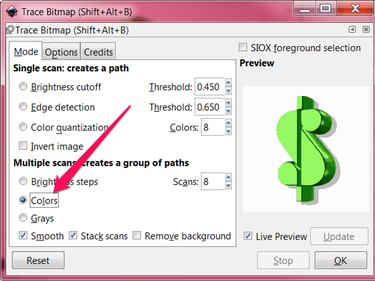
4. Press the OK button to perform the conversion, and the new vector image is inserted into the Inkscape main window.
Step 3: Save the Image as a Vector Graphics File
Although the new vector image has been added to the window, the original bitmap image is still in the window, and you need to delete the bitmap image before you save the file.
1. Select the original image in the main window and press the Delete key on your keyboard.
2. Open the File menu and select Save As....
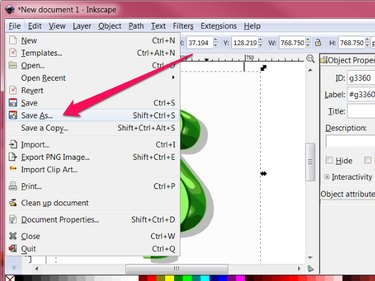
The Save As... dialog opens and prompts you to Select file to save to.
3. Navigate to the folder where you want to save the vector graphics file and enter the name for your new file.
4. Click the Save as type field to open a list of file types.

5. Select the file type you wish to save.

6. Press the Save button to create your file.