With the Shapes and Text Box options in Publisher, you can create your own custom logo to use in your document or to save as an image file for other projects. To make your first logo, give a unique flair to a stylized initial set inside a circle or other shape.
Step 1

Click the Insert tab, select Shapes and then choose a shape for your logo. An oval, rectangle or rounded rectangle generally work well for logos. Drag the cursor over the document where you want the logo to appear. To draw a circle with an oval, or a square with a rectangle shape, hold down the Shift key as you drag the cursor.
Video of the Day
Step 2
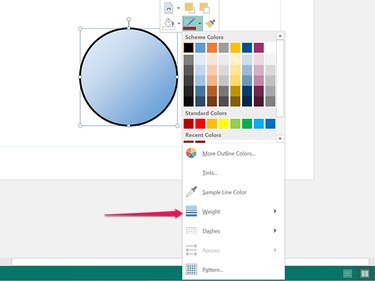
Right-click the shape and select the Shape Outline icon. From the drop-down menu, choose a Color, and select a Weight to determine the line's thickness. To create a dotted or dashed line, select Dash from the drop-down menu. To see additional outline options, such as multiple lines, select More Lines from the bottom of the Weight or Dash options.
Step 3
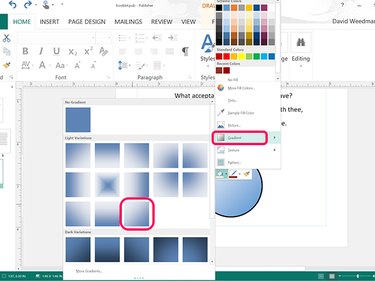
Right-click the shape and select the Shape Fill icon. Select a color for the fill. To add a Linear Diagonal Gradient, as illustrated here, select Gradient from the drop-down menu.
Step 4
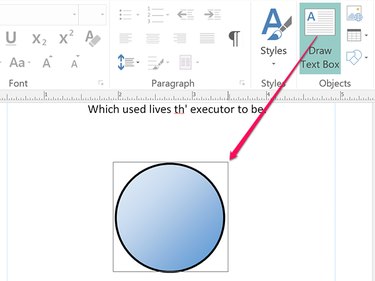
Click the Insert tab and then click the Draw Text Box icon. Drag the cursor over the shape and type a word, letter or initials in the text box.
Step 5
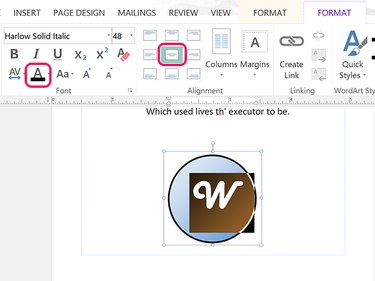
Highlight the text by dragging the cursor over it and then click the Text Box Tools' Format tab. Click the Center Alignment icon. Choose a foreground color for the text by clicking the Font Color icon. Select a thick font and select the Font Size to adjust it so it fills the shape. Center the text over the shape by clicking the text box border and nudging its position with the arrow keys.
Step 6

Press Ctrl-C while the text box is selected and press Ctrl-V to paste a copy above it. Drag the second text box so it's perfectly aligned over the original.
Step 7
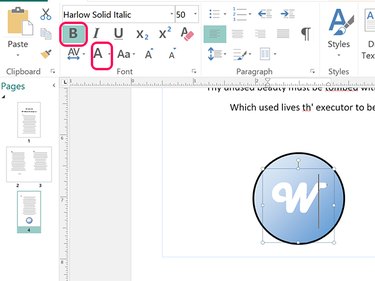
Highlight the text on the duplicate text box. Click the Bold icon in the Text Box Tools' Format ribbon and then choose a background color from the Font Color icon.
Step 8
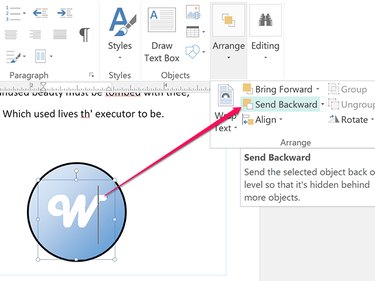
Click the Arrange icon in the Text Box Tools' Format ribbon and select Send Backward. This step puts the background color behind the foreground text. Because the background text is in bold, it is slightly thicker than the foreground font, making its color appear along the edges of the letters perfectly outlining it.
Step 9

Nudge the background layer's position with the arrow keys as needed to make the background color appear only on one side of the text.
Step 10
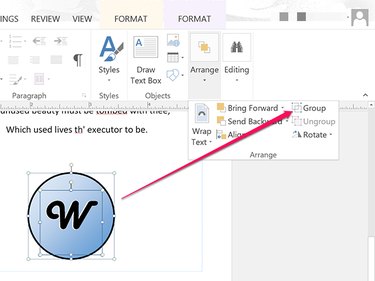
Drag the cursor over the shape and both text boxes to select them all. Click the Arrange icon in the Text Box Tools' Format ribbon and select Group. Grouped together, you can now move, resize or save all the pieces making up the logo as a single entity.
Step 11
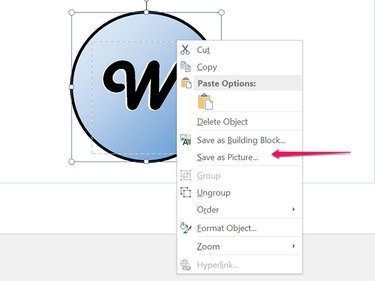
Right-click the logo and select Save as Picture. A navigation window opens.
Step 12
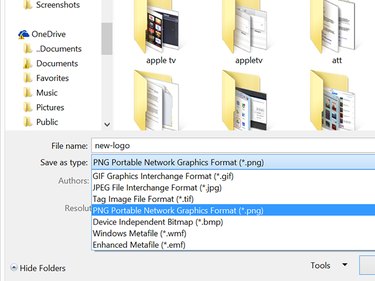
Click the Save as Type menu in the Navigation window and select a file format for the new logo, such as GIF, JPG, TIF or BMP. Give the logo a name and click Save. You can now use this logo in any other documents. To add it to future Publisher documents, use the Picture option in Publisher's Insert ribbon.
Video of the Day