
Whenever you use your laptop, Windows 8.1 automatically saves data about the programs, folders and documents you open, your browsing history and the items you delete. This information is readily available to anyone who has access to your computer and knows where to look. To remove your historical data, navigate to each location that has the settings to delete your information -- such as the Internet Properties utility, the Recycle Bin and the Taskbar and Navigation Properties utility.
Clear Browsing History
Video of the Day
Step 1
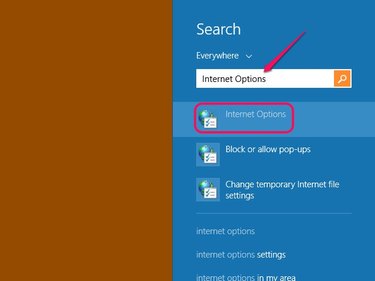
Press the Windows key to open the Modern UI and type Internet Options. Select Internet Options from the Results list to open the Internet Options dialog window. To open the Internet Options window in Windows 7, click the Start button and then select Control Panel. Select Network and Internet and click Internet Options.
Video of the Day
Step 2
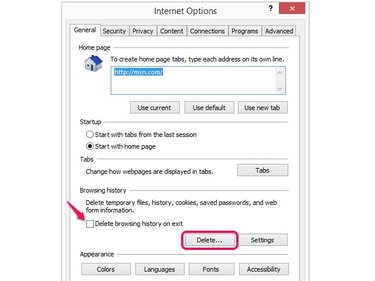
Click the Delete button in the Browsing History section of the window's General tab. Select the Delete Browsing History... check box to automatically erase your browsing history after exiting the operating system's native browser.
Step 3
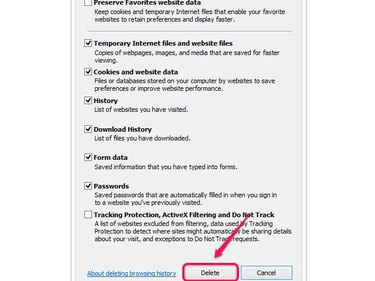
Select the Temporary Internet Files and Website Files, Cookies and Data, History, and Download History check boxes to delete cookies and related Internet data that are stored on your laptop's hard drive. To remove information and passwords that you entered in website forms -- such as the keywords you entered in a search engine -- select the Form Data and Passwords check boxes. Click the Delete button to remove your browsing data.
Empty Recycle Bin
Step 1

Press Windows-W to open the Search Charm and then type Recycle Bin in the Search field. Choose Free Up Disk Space on This PC from the Results list to open the PC and Devices section of the PC Settings screen.
Step 2
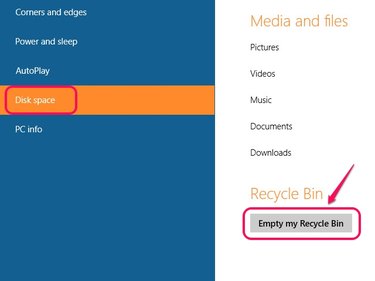
Select Disk Space in the left pane and then click the Empty My Recycle Bin button.
Step 3
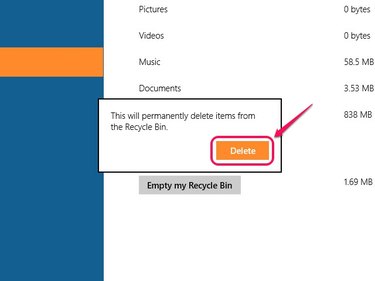
Click the Delete button on the pop-up box to empty your Recycle Bin.
Erase List of Recent Items
Step 1
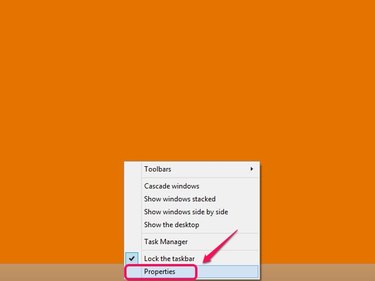
Right-click an empty area of the taskbar and select Properties from the pop-up menu to open the Taskbar and Navigation Properties dialog box.
Step 2
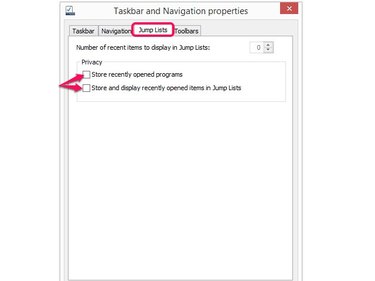
Click the Jump Lists tab and then clear the Store Recently Opened Programs and Store and Display Recently Opened Items in Jump Lists check boxes to prevent your recent items from appearing on the Jump Lists. The number in the Number of Recent Items in Jump Lists changes to zero.
Step 3
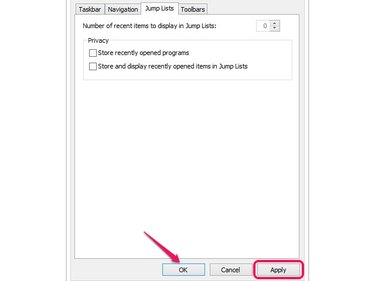
Click the Apply button to erase the list of your recently opened items and then click OK.
- Microsoft Windows: View and Delete Your Browsing History
- Microsoft Windows: Working With Control Panel
- Microsoft Windows: Tips To Free Up Drive Space On Your PC
- Microsoft Windows: Permanently Delete Files From the Recycle Bin
- Microsoft Windows: Clear Lists on the Start Menu and Taskbar
- Microsoft Windows: Start Screen
- Microsoft Windows: Using the Charms for Things You Do Often
- Microsoft Windows: Using Jump Lists to Open Programs and Items
- Microsoft Windows: How to Refresh, Reset or Restore Your PC