Create an attendance sheet in Microsoft Excel to track names each day in school, daycare, club meetings or business meetings. Excel 2013 comes with filters that can sort names alphabetically and even change a list that begins with first names to a list that puts last names first.
Putting Names in Alphabetical Order
Step 1: Enter the Attendees' Names

Enter a list of attendees in the first column of a new Excel worksheet beginning in cell A3.
Video of the Day
Step 2: Type Two Names With the Last Name First
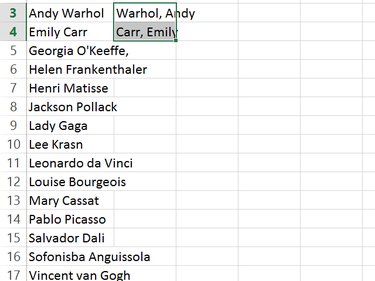
Re-type the first name with the last name first if desired, in cell B3. Retype the second name in the same order in cell B4.
Step 3: Use Flash Fill
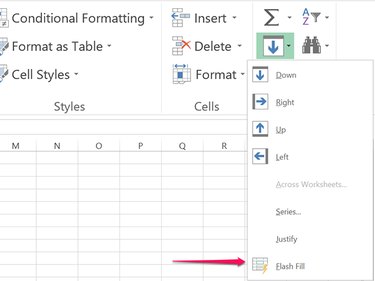
Highlight cells B3 and B4 by dragging the cursor over them, and then click the Home tab. Click the Fill icon in the Editing section of the ribbon and select Flash Fill from the drop-down menu. Excel automatically fills the rest of column B with the names, each with the last name first. Right-click the A header of the first column and select Delete.
Step 4: Sort the Names Alphabetically
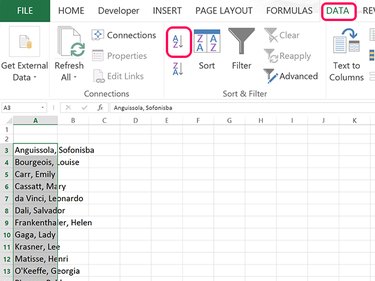
Highlight all of the names now in column A. Click the Data menu and then click the A-to-Z Sort icon. All of the names now appear in alphabetical order based on the last names.
Adding a Title and Days
Step 1: Enter the Text
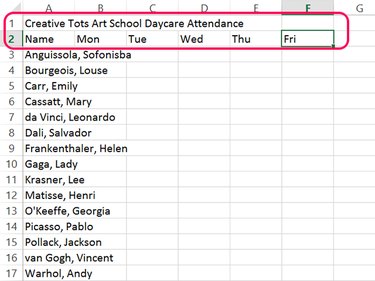
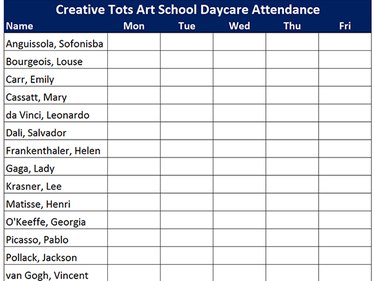
Type a title for the attendance report in cell A1. In cell A2, type Name. In the remaining cells of row 2, type the days you want to track attendance, like Monday to Friday.
Step 2: Merge the Title Cells
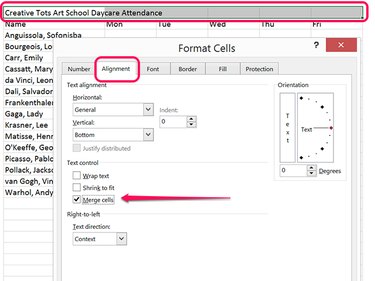
Drag the cursor from cell A1 to the cell that's above the last day you entered, which is cell F1 in our example. Right-click the selected cells and select Format Cells. Click the Alignment tab and then click the Merge Cells check box.
Formatting the Sheet
Video of the Day
Step 1: Change to Page Layout View
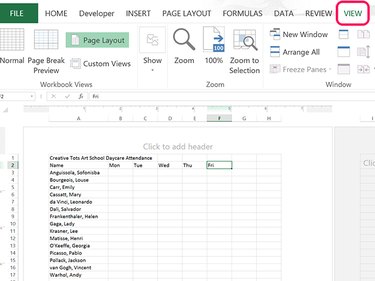
Click the View tab and then click the Page Layout icon. You can now see how the worksheet will appear on a letter-sized page. If you are tracking an entire month of attendance, change the paper orientation by clicking the Page Layout tab, selecting Orientation and clicking Landscape.
Step 2: Color the Title Cells
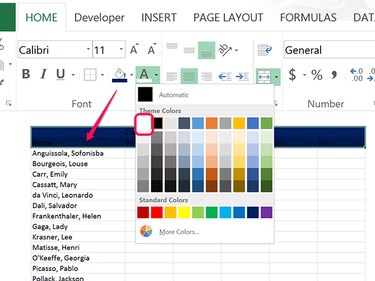
Drag the cursors over the cells containing content in the first two rows. Click the Home tab and then click the Fill icon. Select any fill color you wish. Click the Font Color icon and select a color that contrasts well with the fill, like white on a dark fill color. Change the Font and Font Size if desired and click the Bold icon. Highlight the names in the list and change their Font, Font Size and Font Color as desired.
Step 3: Center the Text
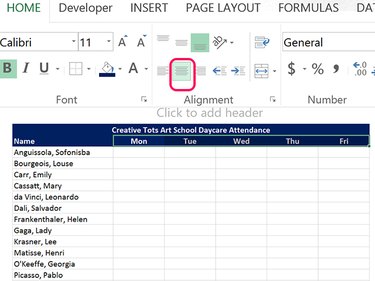
Highlight the cells containing content in the first row, click the Home tab and then click the Center Alignment icon. Highlight the cells containing the dates and put them in Center Alignment as well.
Step 4: Add Borders to the Cells
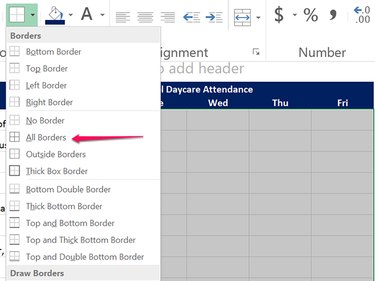
Select all of the cells containing names and the empty cells below each date. Under the Home tab, click the Border icon's Arrow and click the All Borders icon.
Step 5: Print the Sheet
Click the File menu and select Print to print the attendance sheet. To save a copy to use later, click the File menu, select Save and then choose a location to save the file in Excel Workbook's XLSX format.