How to Improve TV Sound Quality With 5 Free Fixes
Voices get buried under music and effects. Quiet scenes send you lunging for the remote, and then an action sequence nearly takes the lamp with it. If that's a typical evening, the problem is almost certainly dialogue clarity and knowing how to improve TV sound quality correctly means you might not need to spend a dollar.
This guide walks through five free fixes in the order most likely to produce results, then a decision framework for when the hardware itself is the limiting factor. Work through the steps before buying anything.
Before you start: what not to do
Video of the Day
A few common instincts make this worse.
Don't just turn up the volume. If dialogue is muffled, more volume makes the effects louder too. The ratio stays exactly the same.
Don't leave the TV in Movie mode for talk-heavy content. Movie and Cinema modes boost bass and treble for dramatic effect, which can push dialogue further back in heavily scored content. Useful for action films; counterproductive for dramas, news, or anything conversation-heavy (MakeUseOf).
Don't assume the TV brand is the culprit. The brand almost never matters here. The problem is usually a settings mismatch upstream of the speakers, a room working against you, or placement sending sound over your head.
Video of the Day
Quick diagnostic: what's your primary complaint?
- Voices sound muffled or get lost in effects: Start at Step 1 (app audio), then Step 2 (sound mode/EQ)
- Room sounds echoey or sound feels "trapped": Start at Step 3 (room acoustics)
- Volume swings constantly between quiet dialogue and loud action: Step 2 (Night mode) is the fastest fix
- Sound distorts at normal volume or can't fill the room: You've likely hit hardware limits skip to the upgrade section
Platform note: Settings menus vary by TV brand and model. Steps below describe the most common paths. If a menu isn't where described, search your TV brand's support site for the equivalent setting it will exist under a different label on most major platforms.
Steps 1–2: fix the source before touching the TV
Both fixes address problems that originate upstream of the speakers. Do these first. They can produce dramatic improvements and make every subsequent adjustment more meaningful.
Step 1: check your streaming app's audio output format
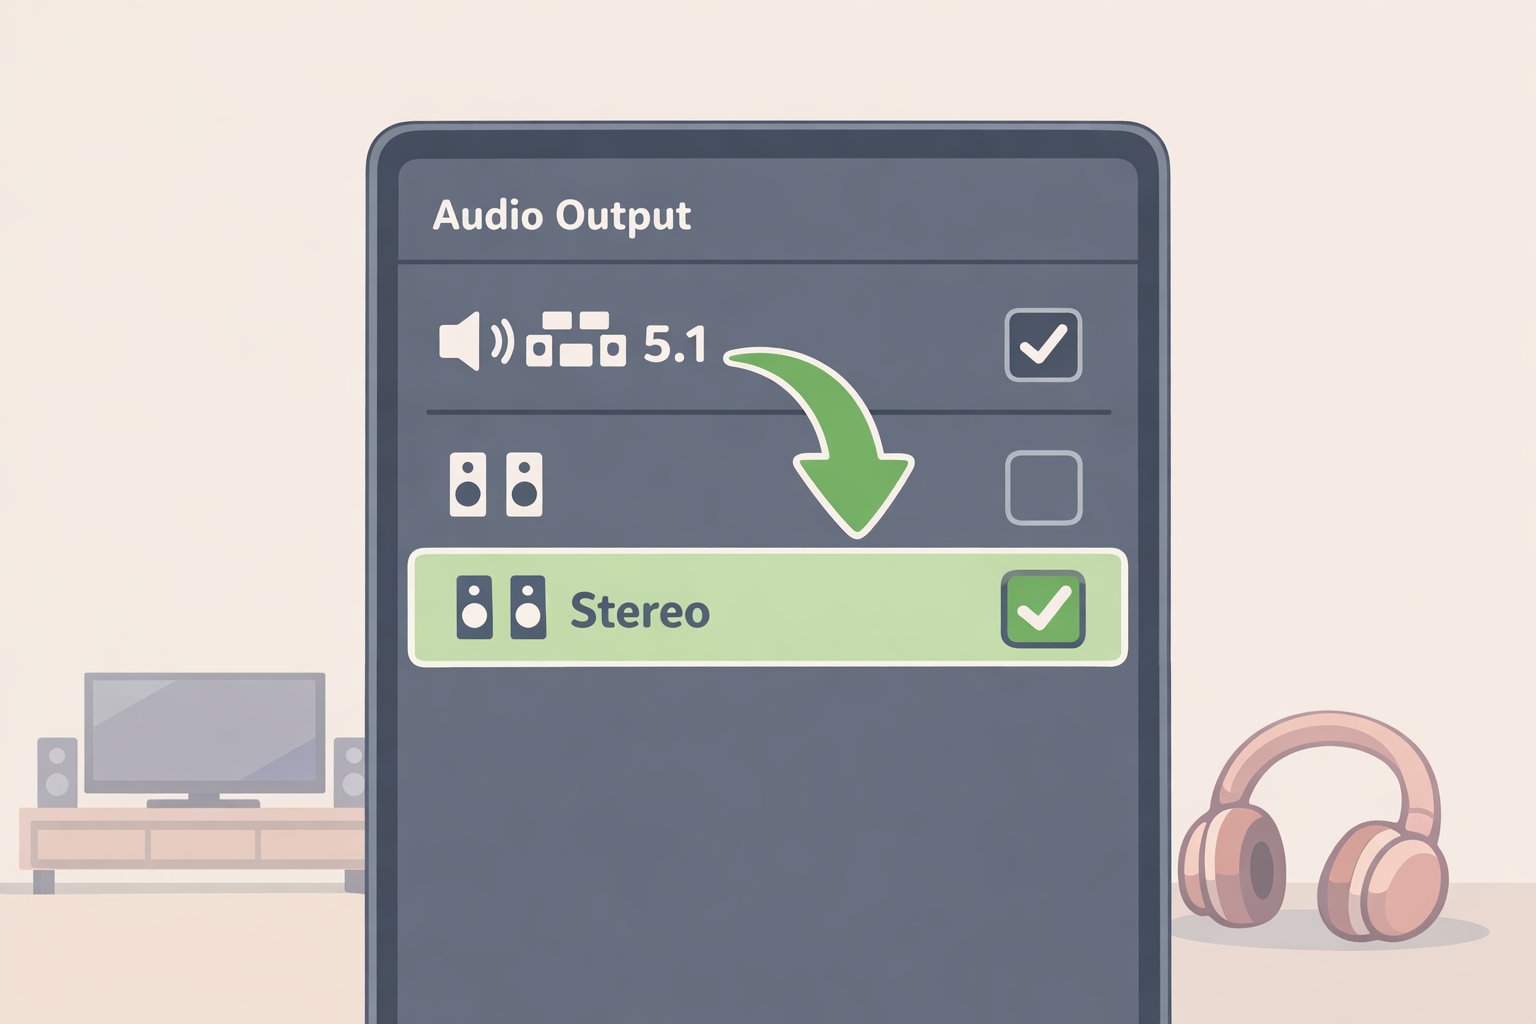
This is the most underdiagnosed cause of muffled TV dialogue, and it takes about 60 seconds to fix.
Streaming apps sometimes default to 5.1 surround output regardless of how the TV is configured. On a stereo setup, this frequently strips out the center channel entirely the channel where virtually all dialogue is routed leaving the mix thin and hard to follow. The fix is an app-level setting, not a TV setting, and Netflix, Disney+, and Prime Video each store it independently (How-To Geek).
Do this:
- Open a streaming app and navigate to its Settings or App Settings (usually via your profile icon or account menu)
- Find Audio Output, Audio Format, or Playback Settings
- If it reads Dolby 5.1, Atmos, or Auto, switch it to Stereo
- On the TV itself, go to Settings > Sound > Audio Output and confirm it's set to TV Speakers or Internal Speakers
- Repeat for each app you use regularly each stores this setting independently
Expected result: If a surround mismatch was the cause, dialogue clarity improves immediately, without changing volume or any other setting. Some readers notice a change here and nowhere else.
Gotcha: If you later connect a soundbar or AV receiver, switch this back to Auto or Atmos to regain full surround decoding.
Step 2: choose the right sound mode, then fine-tune the EQ

Most smart TVs ship with Standard mode active a middle-ground preset optimized for nothing in particular. Switching to a content-matched mode costs nothing and often resolves dialogue problems on its own.
The News or Speech preset labeled differently across brands as Clear Voice, Speech Enhancement, or Dialogue Mode boosts the vocal frequency range and reduces background noise. It's the most direct setting for dialogue clarity (MakeUseOf). Night Mode compresses the dynamic range, keeping quiet dialogue audible without letting explosive scenes shake the room; it's particularly effective for late-night viewing and content with inconsistent mixing (MakeUseOf).
Do this for sound mode:
- Go to Settings > Sound > Sound Mode (exact label varies)
- For dramas, talk shows, news: try Speech, News, or Clear Voice
- For late-night viewing: try Night or Late Night
- Test with content you know well familiar material makes the differences easier to judge
If presets don't get you there, add manual EQ:
- Go to Settings > Sound > Advanced Settings or Expert Settings and look for Equalizer or EQ
Gotcha: On many TVs, the manual EQ is grayed out when a custom sound mode is active. Switch back to Standard mode first if this happens.
- Note all slider positions before touching anything
- Raise the 1kHz–5kHz bands by 1–2 notches this range governs speech clarity and presence (MakeUseOf)
- If voices still sound thin, add a small lift to 100Hz–500Hz for body and warmth stop before it sounds muddy (MakeUseOf)
- If the overall sound seems dull, nudge 10kHz and above upward slightly go slowly; too much introduces harshness
- Watch ten minutes of normal content before deciding; ears adjust quickly to tonal changes
Expected result: Voices feel more present and separated from background sounds, without raising the volume. If you've made it through Steps 1 and 2 and things are better, you may not need to go further.
Steps 3–4: ways to improve TV audio quality that cost nothing
Most guides skip room acoustics entirely. That's a mistake. The surfaces in your room are processing your TV's audio whether you intend them to or not, and placement determines where the sound goes before it gets anywhere near your ears.
Step 3: address room reflections with what you already own
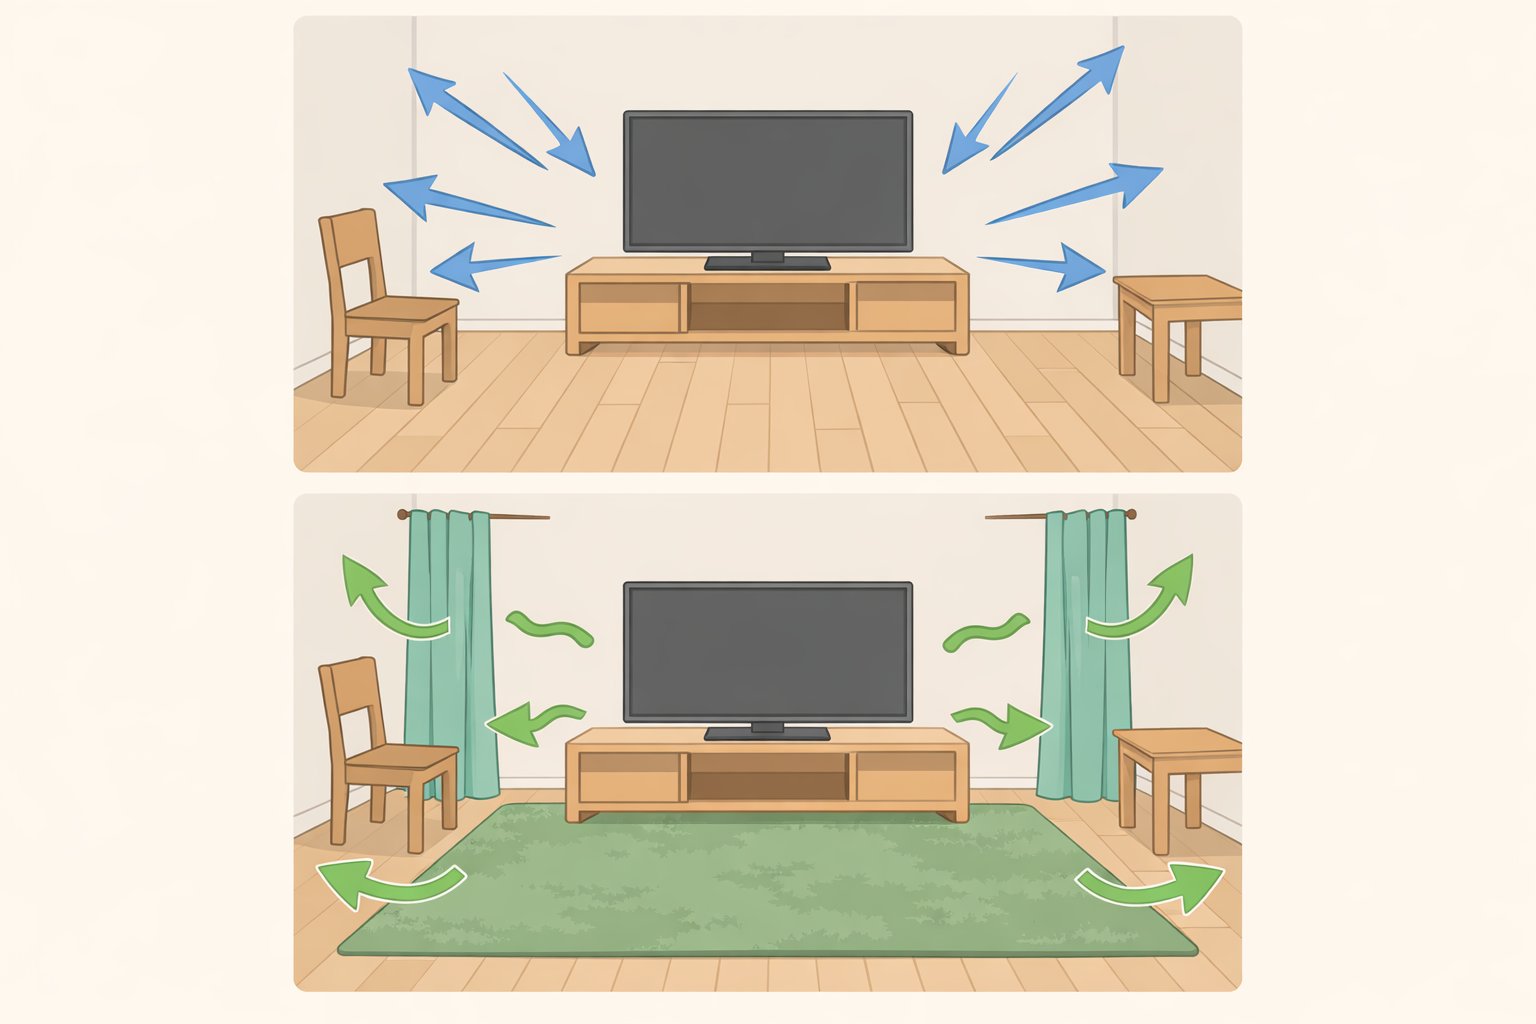
Sound bounces off hard surfaces walls, tile, hardwood, glass creating overlapping reflections that muddy dialogue. Parallel walls are especially problematic, setting up flutter echoes that interfere with the direct sound from your TV (KARE Audio). Soft materials absorb those reflections. Thick rugs, heavy curtains, upholstered furniture, and cushions all reduce echo and improve clarity without spending anything if you already have them (KARE Audio). A bookshelf of unevenly arranged books against a side wall acts as a natural diffuser, scattering sound rather than reflecting it straight back (KARE Audio).
Do this:
- Clap once sharply in the room and listen. A noticeable echo or rapid fluttering indicates excessive reflectivity
- If you have hard flooring, place a thick area rug between the TV and your seating even partial coverage helps
- Close heavy curtains or blinds during viewing if windows face the TV or seating area
- Move a bookshelf to a side wall if one is available, arranged with books at varied depths rather than flush-aligned spines
- Add cushions or a throw to any hard-backed seating in the room
Expected result: Reduced muddiness and echo, most noticeable in rooms with tile, hardwood, or large windows. This one frequently surprises people who assumed the problem was the TV.
Step 4: check and adjust TV physical placement
A TV mounted above a fireplace one of the most common living room configurations sends sound over seated viewers' heads before it reaches them. Ear-level placement aligns the audio output with the listener, reducing the distance sound must travel before bouncing back from ceilings or floors (KARE Audio; MakeUseOf).
Do this:
- Sit in your normal viewing position and note where the TV's speakers sit relative to your ears
- If the TV is more than a foot above ear level, consider lowering it on the stand, adjusting a tilting wall mount bracket, or raising the seating if the mount is fixed
- Test with a dialogue-heavy scene before and after any adjustment
If the TV is above a fireplace and can't be moved, this step isn't available right now but worth keeping in mind if you ever rearrange the room.
Expected result: Voices become easier to understand at the same volume. The effect is most pronounced when the current position is significantly above ear level.
Step 5: check for a firmware update
This step rarely produces dramatic results, but it takes under two minutes and occasionally resolves specific audio bugs that settings adjustments cannot touch. TV manufacturers periodically release updates that improve audio processing or fix known bugs affecting sound output many users run outdated firmware simply because auto-update was disabled or prompts were dismissed (MakeUseOf).
Do this:
- Go to Settings > Support (Samsung), Settings > About (LG, Roku), or Settings > System > Software Update (most other brands)
- Select Check for Updates
- If an update is available, install it and allow the TV to restart
- After restarting, verify your sound mode and EQ settings firmware updates sometimes reset audio preferences to default
Expected result: Usually nothing visible. Occasionally resolves audio sync, processing, or output bugs. Do it once and move on.
When free fixes aren't enough: recognizing the hardware ceiling
If you've worked through all five steps and dialogue is still frustrating, you've likely reached the physical limits of the TV's speakers. That's not a failure it's useful information, and it changes what you buy next.
The signs you've hit the ceiling (MakeUseOf):
- Dialogue remains hard to follow even during quiet scenes with no music
- You're constantly riding the volume between soft conversations and loud action
- Sound distorts at the volume needed to fill the room
- The audio feels "trapped" in the TV rather than coming from the scene
TV speakers are wedged into thin frames with tiny drivers. There's a hard limit to what EQ and mode adjustments can recover from hardware that small (MakeUseOf). The upgrade decision still matters, though not all external audio is equally well-matched to the problem.
Decision framework
Dialogue still unclear, budget under $300
A soundbar with three speakers in the main enclosure meaning a dedicated center channel is the most targeted fix. Films and TV shows are mixed with the center channel carrying dialogue, and a three-speaker soundbar can address that channel directly. Per Consumer Reports, models with three speakers in the main enclosure typically feature a center channel that can enhance dialogue intelligibility. Consumer Reports also rates soundbars against a higher audio standard than TVs judging them more like music speakers so an average-rated soundbar will generally sound better than an average-rated TV (Consumer Reports). The price sweet spot is $200–$300; spending more doesn't guarantee better performance, since soundbars can only be so large before blocking the TV (CNET). Connect via HDMI ARC or eARC for best results.
Want substantially better sound overall, willing to spend $500 or more
At this price tier, the comparison between soundbars and a separate receiver-and-speaker setup is worth making directly. CinemaConfig breaks it down with specific components: a $250 Denon AVR-S670H receiver, a pair of Emotiva B1+ bookshelf speakers at $230, and a Dayton Audio SUB-1500 subwoofer at $250 comes to $730 and that combination, per CinemaConfig, delivers bass extension down to 20 Hz with Audyssey room correction via calibration microphone, four HDMI inputs, and the ability to add surround or height speakers later. The Bose Smart Soundbar 700, by comparison, rolls off below 45 Hz, offers no room correction, and has a closed upgrade path (CinemaConfig). CNET frames it plainly: a 2.1 or 5.1 separates setup delivers an audio experience that can't be matched by a soundbar at any price for listeners who prioritize sound quality over simplicity (CNET). Separates require more setup, more space, and more cables that's a genuine trade-off, and for many households a soundbar remains the right call on those grounds alone.
Free fixes solved it
Stop here. Save the money.
What you've established
Run through these steps with familiar content, take notes on what changed at each stage, and the outcome is one of three things: a settings mismatch (most likely the app audio format or sound mode), a room or placement issue, or a genuine hardware limitation. Each branch points somewhere specific.
Changes to the physical environment are among the most overlooked improvements available and cost nothing (KARE Audio). If dialogue is still hard to follow after all five steps, a three-channel soundbar is the most targeted external fix. Anyone planning to spend $500 or more should compare a receiver-plus-speakers setup against a soundbar at the same price the separates path offers frequency extension, room correction, and expandability that soundbars can't replicate (CNET).
Soundbar buyers: prioritize HDMI ARC/eARC connectivity and a three-channel enclosure with independent center-channel control. Separates buyers: start with a stereo receiver and a bookshelf pair a subwoofer and surround channels can follow when the budget allows.