Nintendo Switch 2 Accessibility Features: How to Set Up All 7 Tools
Before touching any of the seven Nintendo Switch 2 accessibility features covered here, update to system version 22.0.0 or later. Nintendo Support notes that some features are added through system updates, and one in particular the screen reader changed substantially with 22.0.0. That update, released earlier this year, is what makes independent first-time setup possible for blind players for the first time.
By the end of this guide, you'll know how to find and configure all seven tools, what to expect from each one, and exactly where each stops being useful so you're not hunting for settings that don't exist.
One thing to be clear about upfront: only the screen reader can be activated during first-time setup on version 22.0.0 or later. The other six features remapping, zoom, text size, color filters, audio settings, GameChat all require completing setup first and configuring them through System Settings afterward. Each section notes its own boundary so you know when the system hands off to a game's own options.
Can I Play That? assessed the Switch 2 last summer as an across-the-board improvement over the original Switch across all major accessibility categories. That's a reasonable baseline. The gaps that remain are documented here too.
How to use accessibility features on Nintendo Switch 2
Video of the Day
1. Screen reader (text-to-speech)
The screen reader is the one feature where your firmware version has an immediate, concrete effect and the one feature that works during first-time setup on 22.0.0 or later.
At launch, the screen reader couldn't be activated until after setup was already complete. Access-Ability noted at launch that blind players needed sighted help just to get through the initial configuration, calling it a hard barrier to independent use. Can I Play That? described the fix when it arrived earlier this year as an essential accessibility correction that should have shipped at launch.
Steps:
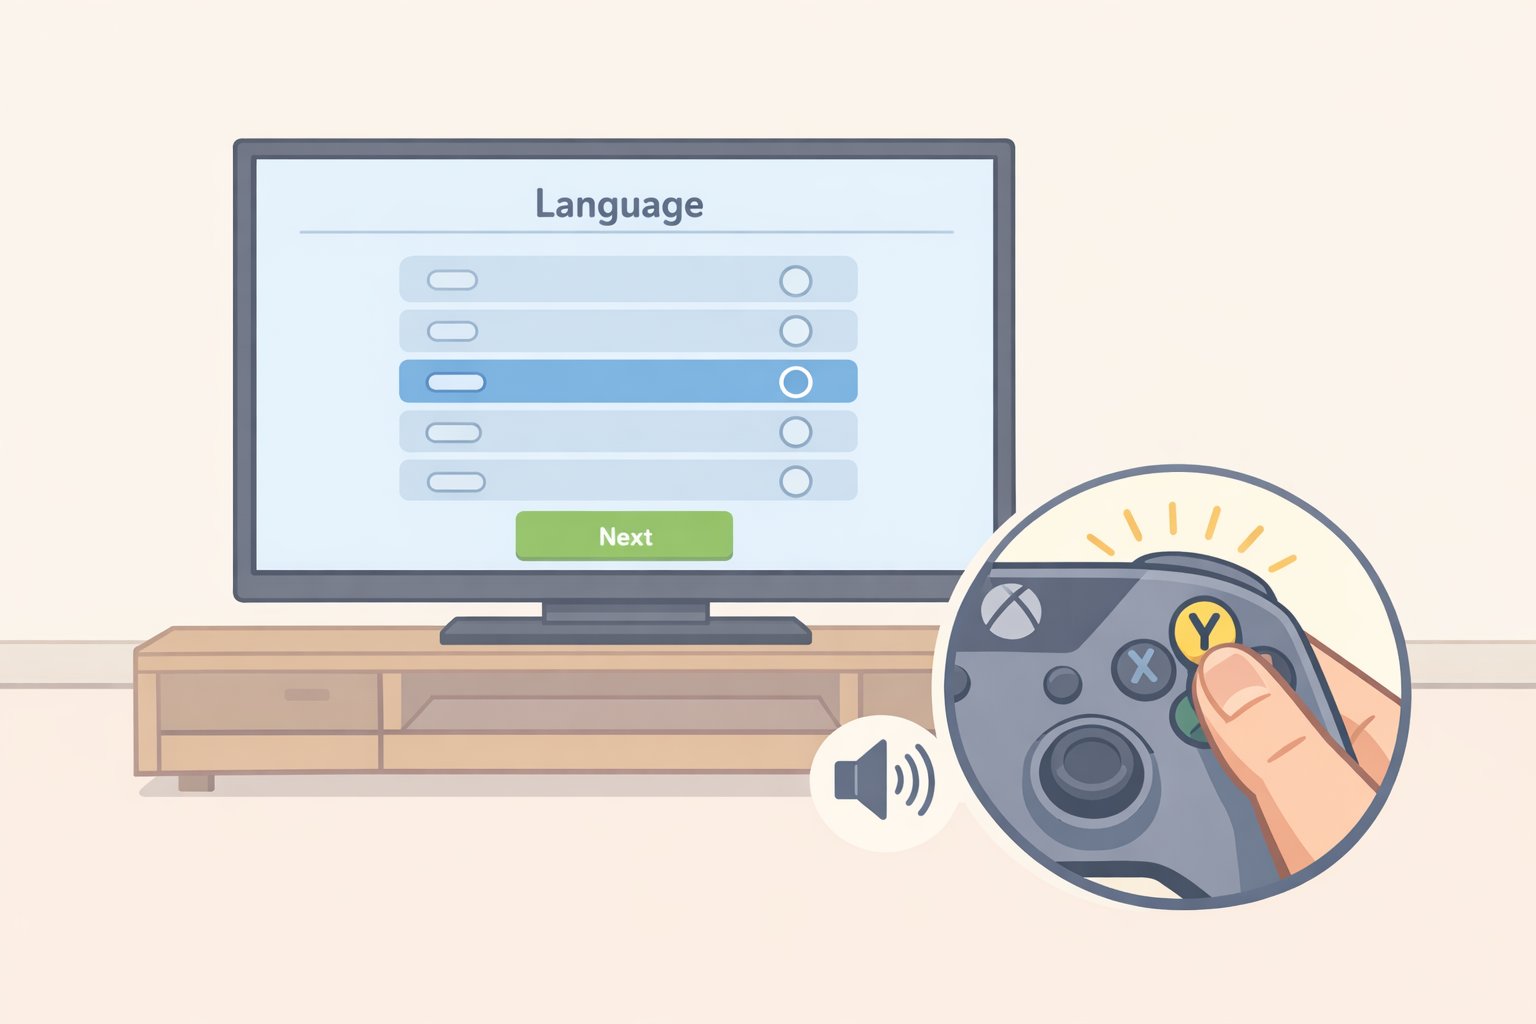
- New console on version 22.0.0 or later: On the language selection screen, hold the Y Button to enable text-to-speech immediately, per Nintendo Support. If the console shipped on older firmware, connect to Wi-Fi during setup, apply the update, then hold Y when the system transfer prompt appears.
- Already-configured console: Go to System Settings, then Accessibility, then Text to Speech. Toggle it on.
- Adjust voice type, reading speed, and volume from the same menu. The speed slider runs from 50% to 300%, per The Verge.
- Once enabled, the reader covers the HOME Menu, System Settings, and as of the earlier-this-year update the photo album, per Nintendo Support. It announces the item your cursor is on plus its position on screen.
On speed: The Verge measured both US English voices at around 120–130 words per minute at default. Maximum slider speed reaches roughly 400–420 words per minute the range where many experienced screen reader users operate. There is a noticeable delay between landing on a menu item and the audio starting. Plan for it.
The screen reader doesn't work in the eShop, and most games including Nintendo's own first-party titles like Mario Kart World don't support system-level text-to-speech, as The Verge confirmed at launch. For eShop browsing and in-game navigation, check each title's own settings.
Language support covers US English, UK English, Canadian French, Latin American Spanish, German, European French, European Spanish, Italian, Japanese, and Korean, per Nintendo Support.
2. Button remapping and controller presets
Remapping on the Switch 2 works per controller and saves as named presets practical if you switch regularly between games with different control demands, play one-handed, or prefer a different layout.
Steps:
- Go to System Settings, then Accessibility, then Button Mapping. Only currently connected controllers appear in this menu connect what you want to remap before opening it, per Nintendo Support.
- Remap any input. Each Joy-Con can be configured independently, per The Verge.
- Save the layout as a named preset. The console holds up to five presets per controller, per Nintendo Support. Turning remapping off later doesn't delete saved presets.
- For switching presets mid-game: enable "Change Button Mapping" in Quick Settings, then hold HOME at any time to swap without leaving the game.
One gotcha before you start: the GL and GR back buttons on the Joy-Con 2 Charging Grip and Switch 2 Pro Controller can only be mapped from Quick Settings during active gameplay, not from System Settings. Per Access-Ability, these bindings save per user and per game, so they carry over automatically when you return to the same title.
There's also a single global toggle to swap the A and B buttons across all controllers simultaneously, per Can I Play That? useful for players coming from other console conventions.
On adaptive controllers: the Hori Flex works with the Switch 2 docked or in tabletop mode via USB adapter, per Access-Ability. Original Switch Joy-Cons and Pro Controllers also work. One caveat: Switch 1 controllers can't wake the console from sleep mode.
The Verge confirmed that Nintendo's own first-party titles, including Mario Kart World, don't offer in-game remapping. System-level presets still apply, but you're swapping through the Quick Menu rather than the game providing the option natively.
3. Visual readability: text size, bold text, and high contrast

These three settings work as a stack. Larger text helps with legibility. Bold increases contrast between letterforms and background. High contrast goes further still Can I Play That? describes it as increasing contrast on borders and other structural UI elements, not just text. Any one of them is worth enabling on its own; together they make a more substantial difference.
Steps:
- Go to System Settings, then Accessibility, then Text Size. Two sizes larger than the default are available, per Can I Play That?
- In the same menu, toggle Bold Text on.
- Toggle High Contrast on.
- Also check System Settings, then Themes. A dark theme is available, per Can I Play That? It changes the overall interface tone and is worth trying before reaching for the color filter options below.
These settings apply only to system menus, per Nintendo Support. When you launch a game, check its own accessibility or display options for text sizing and contrast controls.
4. Screen zoom
Zoom returns from the original Switch, now expanded with touchscreen pinch support in handheld and tabletop mode, per Can I Play That? Unlike text size, it's not a persistent setting it's an on-demand tool you activate when you need it, and it works anywhere in the system UI once enabled.
Steps:
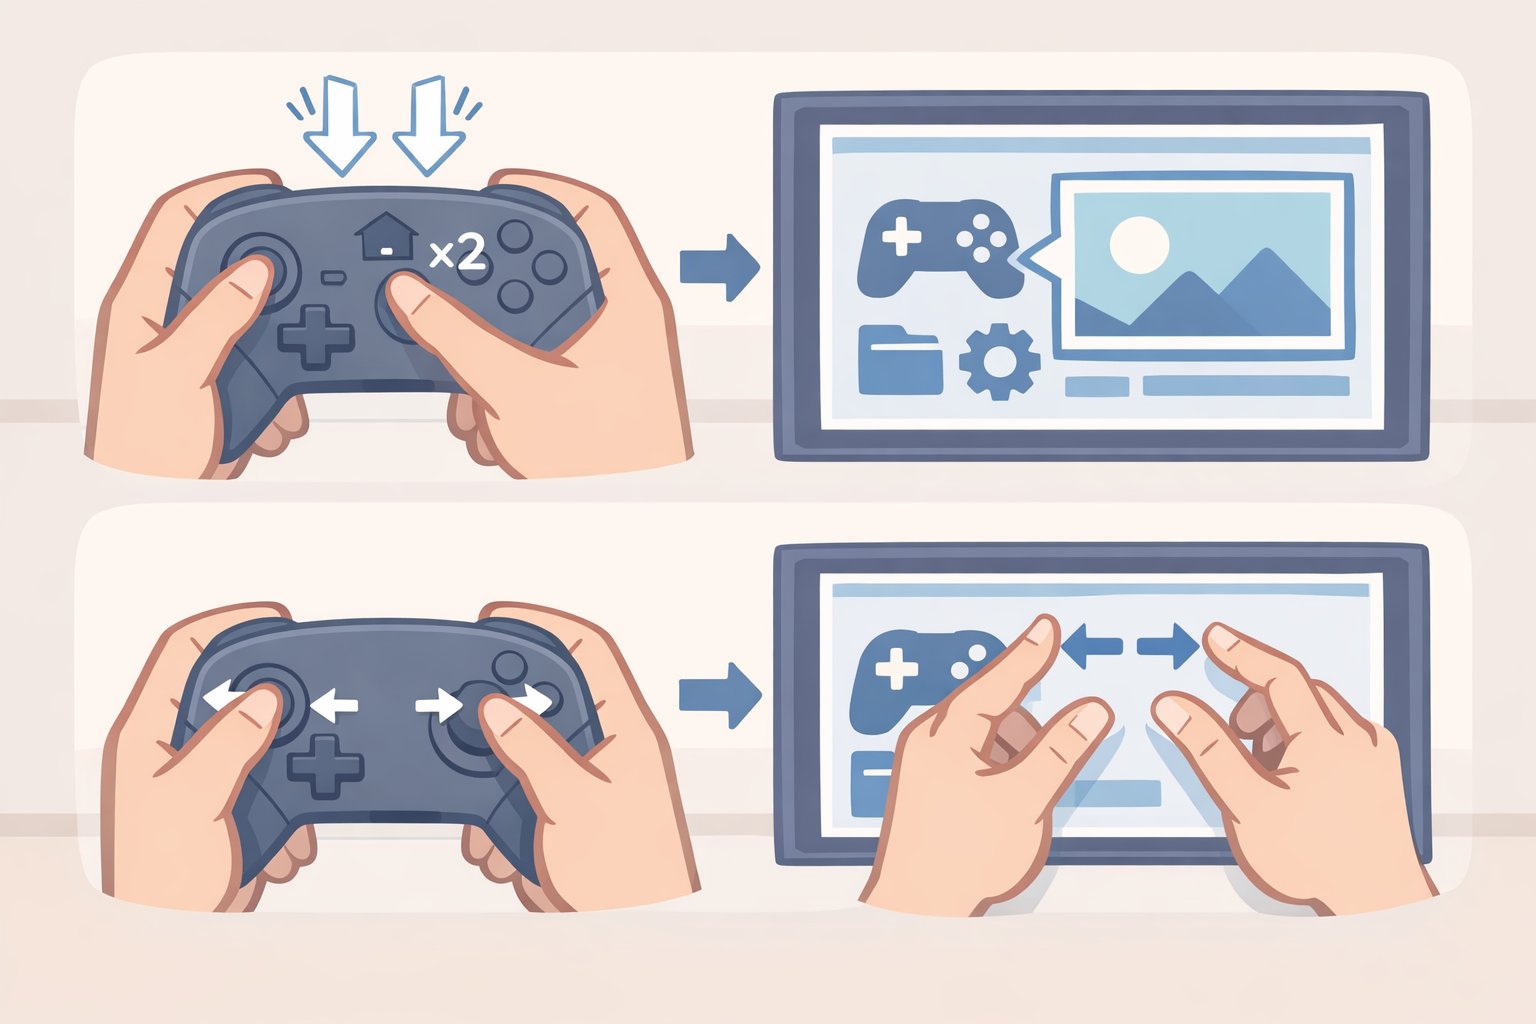
- Enable Zoom in System Settings, then Accessibility, then Zoom.
- Press HOME twice quickly to zoom in. Press HOME twice again to exit.
- While zoomed: move the focused area with the Left or Right Stick. Press HOME once to lock the view in place. Press X or Y to step the zoom level up or down.
- In handheld or tabletop mode, use a two-finger pinch on the touchscreen to adjust zoom level directly, per Nintendo Support.
The double-tap HOME shortcut makes zoom a practical fallback even if larger text is your primary tool. Zoom in, read the element, zoom back out it takes a second and works reliably across system menus.
5. Color filters: invert and grayscale
Steps:
- Go to System Settings, then Accessibility, then Display Colors.
- Choose from three options, per Nintendo Support:
- Default: Standard colors, no adjustment.
- Invert colors: Fully inverts all colors on screen white turns black, all hues flip.
- Grayscale: Removes all color, leaving a fully monochrome display.
As with text size, the dark theme (System Settings, then Themes) is worth checking first. The color filter options are independent of the theme setting and can be used alongside it, per Can I Play That?
6. Mono audio and Bluetooth hearing device support
Steps:
- Mono audio: Go to System Settings, then Sound, then Mono Audio, and toggle it on. This combines the left and right channels, per Can I Play That? The Verge calls mono audio an important feature for hard-of-hearing players and notes it's one of the few audio settings available at the system level broader customization like equalization isn't available on the Switch 2 outside of individual games.
- Bluetooth hearing aids and headphones: Go to System Settings, then Controllers and Sensors, then Bluetooth Audio. The Switch 2 supports direct Bluetooth pairing for headphones, earbuds, and Bluetooth-enabled hearing aids without an adapter, per Can I Play That?
- Virtual surround (optional): Available in handheld and headphone mode via System Settings, then Sound. Can I Play That? notes this applies spatial sound effects to stereo output and can help visually impaired players locate the source of sounds. Whether it's useful depends on a given game's own audio design.
One secondary setting worth knowing: System Settings, then Notifications. Notification sounds can be disabled independently of visual alerts, and friend-online notifications can be limited or turned off entirely, per Can I Play That? It doesn't touch in-game audio, but it removes a consistent source of auditory interruption during play.
7. GameChat speech-to-text and text-to-speech
For deaf or hard-of-hearing players who want to follow voice chat as text, or players who prefer to type rather than speak, GameChat covers both directions.
Steps:
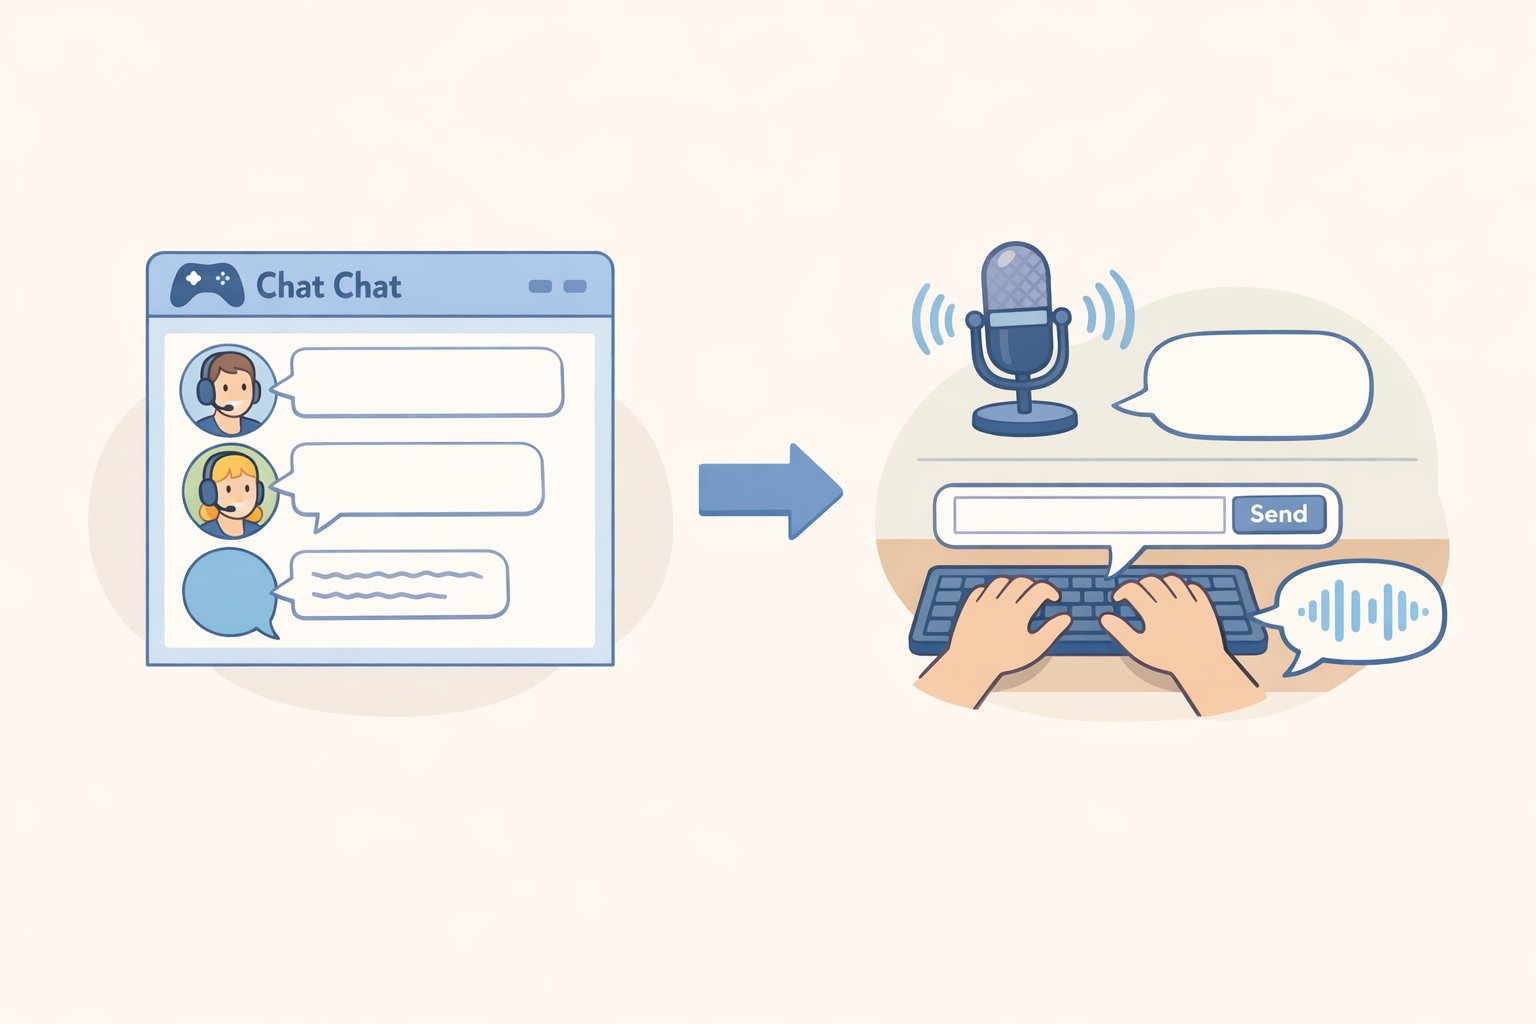
- Open a GameChat session. Access communication settings from within the GameChat interface.
- To read other players' speech as text: Toggle "Display Speech as Text" on. Other participants' voices are transcribed and appear in a chat box alongside your main screen, per Nintendo Support.
- To send typed messages as spoken audio: Toggle "Convert Text to Speech" on. Type via keyboard and the system reads your input aloud to everyone else in the session.
- Check the Language setting under speech-to-text. It defaults to your system language, and transcription only recognizes speech in the language selected, per Nintendo Support.
GameChat transcribes profanity accurately rather than replacing it with filtered placeholders. The Verge and Access-Ability both flag this as a meaningful accessibility decision it allows deaf players to engage fully with in-game communication without deciphering censored approximations of what was said. Occasional word substitutions do occur, but these are recognition errors, not deliberate filtering.
Language support: full speech-to-text and text-to-speech work in US English, UK English, Canadian French, Latin American Spanish, German, French, Spanish, Italian, Japanese, and Korean. Brazilian Portuguese, Russian, and Portuguese support speech-to-text only, per Nintendo Support.
Video of the Day
Where the system still falls short
Three gaps are worth naming before relying on any of these tools too heavily.
The screen reader's coverage has grown it launched covering the HOME Menu and System Settings, and the earlier-this-year update added first-time setup and the photo album but the eShop remains unsupported. Access-Ability concluded at launch that fully independent navigation by blind players was out of reach without sighted assistance. The update narrowed that gap at the start of the experience; it didn't close it across the system.
The Switch 2 has no Controller Assist mode. On Xbox, the equivalent feature (Co-Pilot) lets two controllers share input for a single player. Access-Ability flagged its absence at launch, and it remains absent.
The visual settings text size, bold, high contrast, color filters stop at the system interface. Every game requires its own separate check, as Nintendo Support acknowledges directly.
Whether the eShop and game-level integration follow depends on whether Nintendo treats accessibility as an ongoing firmware priority. The update history suggests that's possible. It isn't guaranteed.