
Laptops use the convenient touchpad and integrated scroll mouse that allow you to use just your finger to navigate Web pages, documents and open files and programs. Just like all other hardware, the laptop's integrated touchpad and mouse can experience errors and problems that cause you to lose functionality for a length of time. Whether the laptop's mouse is not working because of internal errors or conflicts with another device, several "tricks" can work to restore it.
Step 1

Locate the function "Fn" button on your laptop in the lower left corner of the keyboard. Look in the keyboard's upper row (the F1 through F12 buttons) for an icon of a touchpad or computer mouse. This keyboard button acts as the toggle switch to enable and disable the built-in mouse and touchpad function. Press and hold the "Fn" button together with the mouse icon button. Look for the disable/enable symbol that briefly displays on your screen. Slide your finger over the laptop's mouse and attempt to use it as normal.
Video of the Day
Step 2
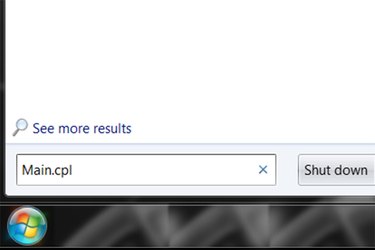
Press the Windows keyboard key if using Windows 7, type "main.cpl" in the search box and press "Enter." Press the left arrow key to navigate over to the "Device Settings" tab. Press the tab key to reach the "Enable" button in this section. Press "Enter" on your keyboard. Press the tab key to reach the "Disable internal pointing device" check box. Press the space bar to remove the check mark. Put your finger on the touchpad, and move the pointer down to the "Apply" button. Click "Apply" to save the settings. Close the mouse "Properties" box.
Step 3
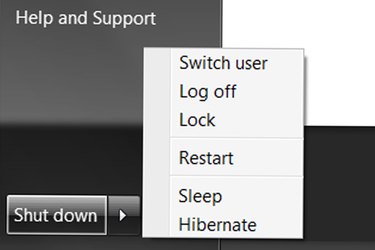
Press the keyboard "Windows" logo key to open the "Start Menu." Press the arrow keys on your keyboard to navigate to the "Shut Down" or "Turn Off Computer" menu. Press the up or down arrow key to highlight "Restart." Press "Enter" to restart your computer and attempt to use the laptop mouse as it should normally function.
Step 4
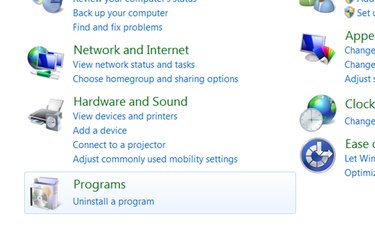
Open the "Control Panel." Go to the "Add and Remove" or "Uninstall" programs section. Highlight any secondary mouse devices in the list that you have installed for your laptop, such as an external USB mouse. Select the "Uninstall" option to remove any software and settings associated with this secondary mouse. Restart your computer and attempt to use the built-in laptop mouse as normal. Check to see if the mouse is working properly.
Step 5
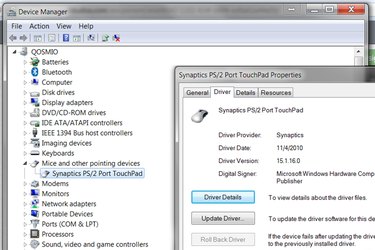
Press the keyboard's "Windows" button to open the "Start Menu." Press the keyboard's arrow keys, "Enter" button and "Tab" to navigate to and open the "Control Panel." Go to the "Hardware and Sound" section, and press "Enter." Navigate to "Device Manager," and press "Enter" to open it. Find "Mice and other pointing devices from the list" and open its "Properties" dialog box. Select the "Driver" tab and choose "Update Driver." Allow Windows to search the Internet for drivers and to update them automatically. Restart your computer after the drivers are updated, and use your mouse as normal.
Video of the Day
- Microsoft Support: Error Message When you Upgrade to Windows 7: "Your TouchPad has been disabled because the Synaptics TouchPad Driver has Detected another Pointing Device Plugged into your Computer"
- Tips 4 PC: Beginner Guide to Using a Computer Mouse? Tips and Tricks
- Web Developer Notes: Laptop not Working - Touchpad Unresponsive